Connecting Royal MCP to ChatGPT
Connect Royal MCP to ChatGPT via Plugins (previously called Custom Apps, and originally Custom Connectors) — a Developer-Mode feature available on every paid ChatGPT plan. Setup is a one-time Developer Mode toggle plus a New Plugin configuration. Read the plan-tier note immediately below before starting; what ChatGPT can do with Royal MCP depends on which plan you’re on.
Same feature, three names in the last year: Custom Connectors → Custom Apps → Plugins (current, as of August 2026). Older Royal Plugins support docs and OpenAI’s own historical documentation may still use the earlier names. Wherever you see any of the three, they refer to the same feature. This page uses the current name (Plugins) throughout.
ChatGPT’s Plugins feature behaves differently across plans:
- Free — no Plugins at all
- Plus / Pro — Plugins work, but ChatGPT is limited to read/fetch actions only (read your posts, pages, settings, WooCommerce data; cannot create, update, or delete)
- Team — read + limited write actions
- Business / Enterprise / Edu — full read + write/modify support
If you want the full “AI publishes my blog post” / “AI updates my products” experience, you need Business tier or higher on ChatGPT. On Plus or Pro you’ll get read-only — useful for reporting + analysis, but not for content management. (Claude.ai has no such tier gate — if you need write actions and you’re on a personal ChatGPT plan, Claude is the better fit until OpenAI lifts the restriction.)
First — Install and Enable Royal MCP
Before connecting anything to ChatGPT, Royal MCP needs to be running on your WordPress site. Three small steps:
Install the plugin
In wp-admin, go to Plugins → Add New, search for Royal MCP, and click Install Now. Or download the latest version from wordpress.org/plugins/royal-mcp/ and upload the zip.
Activate
On the Plugins page, click Activate under Royal MCP. A new Royal MCP item appears in your wp-admin sidebar.
Enable the integration + flush Permalinks
Go to Royal MCP → Settings → General Settings and turn on the Enable Royal MCP Integration toggle (it’s off by default after activation). Then go to Settings → Permalinks and click Save Changes once — this flushes WordPress’s rewrite rules so the OAuth endpoints resolve. Don’t skip this; the ChatGPT setup below won’t work until rewrites are flushed and Permalinks must not be set to “Plain.”
Open https://example.com/.well-known/oauth-authorization-server in any browser. If you see a JSON response listing issuer, authorization_endpoint, and scopes_supported, Royal MCP is live and the ChatGPT setup below will work. If you see a 404 or an HTML page, jump to the troubleshooting checklist — something is intercepting your request before it reaches WordPress.
Enable Developer Mode in ChatGPT
Custom Plugins live behind ChatGPT’s Developer Mode — a feature gate that signals to OpenAI you understand the security implications of granting external services tool access. You enable it once per account; it stays on until you turn it off.
Sign in to ChatGPT
Open chatgpt.com in any browser. You must be on a plan that supports Plugins (Plus, Pro, Team, Business, Enterprise, or Edu — Free tier doesn’t have the feature).
Open Settings → Plugins
Click your profile icon (bottom-left of the ChatGPT sidebar) and choose Settings. In the Settings panel that opens, click Plugins in the left sidebar. (This tab was called Apps before the August 2026 rename, and Connectors before that.)
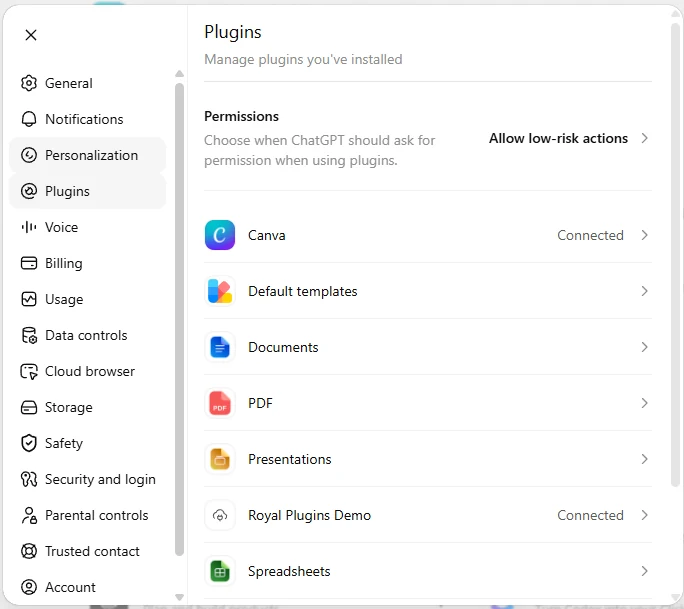
ChatGPT → Settings → Plugins. The list shows both OpenAI first-party plugins (Canva, Documents, PDF, etc.) and a connected Royal MCP install (“Royal Plugins Demo”). This tab was called “Apps” before the August 2026 rename, and “Connectors” before that.
Open Advanced settings → toggle Developer Mode ON
Near the bottom of the Plugins panel, click Advanced settings. Toggle Developer Mode to ON. OpenAI shows an ELEVATED RISK warning about the responsibilities that come with Plugins — read it and confirm.
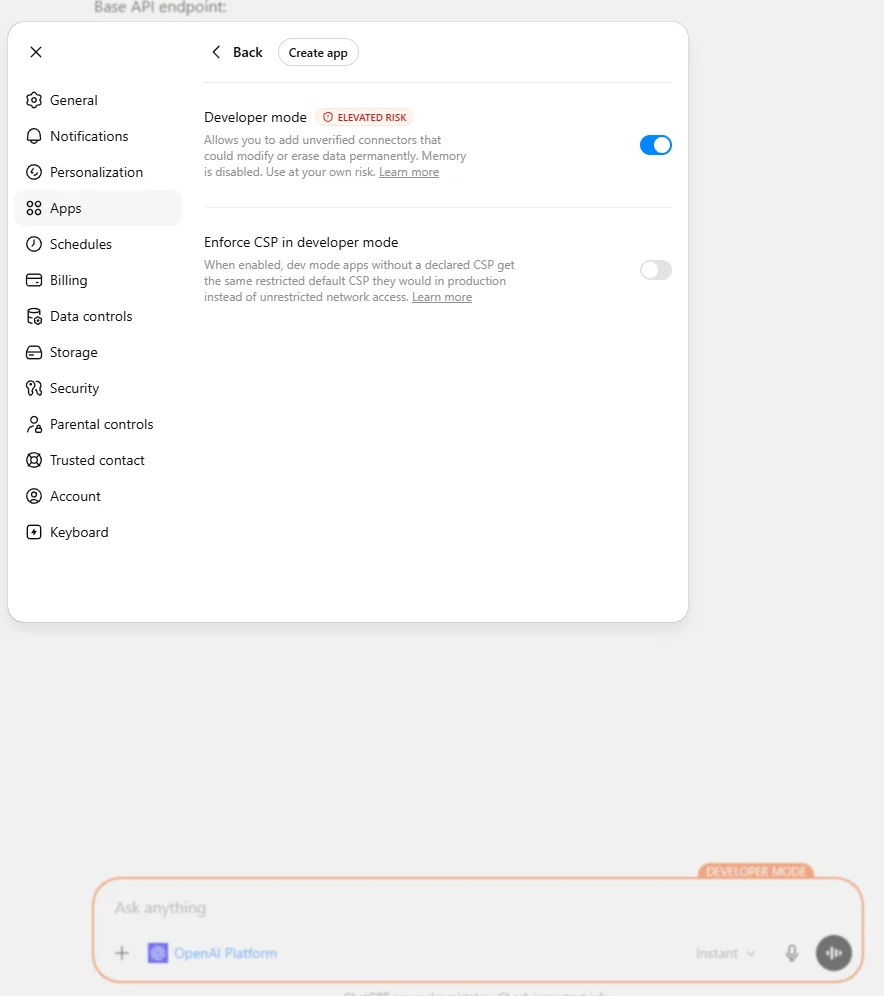
Developer Mode ON. The ELEVATED RISK badge and the “Memory is disabled” note are part of the toggle — OpenAI’s explicit acknowledgment that you’re running unverified MCP servers.
Three things to check: (1) you’re on a paid tier — Free ChatGPT doesn’t have it; (2) if you’re on Team / Business / Enterprise / Edu, your organization’s admin may have disabled Developer Mode for member accounts — check with them; (3) very recent Plus/Pro upgrades sometimes need a sign-out + sign-in to pick up the new account capability.
Add Royal MCP as a Plugin
With Developer Mode on, the Add more button appears at the top-right of the Plugins panel. Clicking it opens the New Plugin dialog — this is where you tell ChatGPT how to reach Royal MCP.
Click Add more → the New Plugin dialog opens
Back on Settings → Plugins, click Add more (top-right of the panel). The New Plugin dialog opens.
Fill in the New Plugin dialog
The dialog has several fields plus a mandatory risk-acknowledgment checkbox. The icon is optional; skip it unless you want a custom badge in your Plugins list:
- Name — a memorable label that appears in your Plugins list. Something like “My WordPress Site” or your site name works well.
- Description — actually matters: ChatGPT reads this to decide WHEN to invoke the Plugin during conversations. Be specific. Good: “Manages content, settings, and WooCommerce data on my WordPress site.” Bad: “WordPress MCP.”
- Connection → Server URL — your Royal MCP server endpoint:
https://example.com/wp-json/royal-mcp/v1/mcp(substitute your bare domain only — no leadinghttps://in the substitution, the protocol is already in the template). The dialog’s placeholder showshttps://example.com/sse— ignore that, Royal MCP uses the streamable HTTP MCP transport at the URL above, not SSE. (The Tunnel radio option next to Server URL is for developers running an MCP server locally via ngrok-style tunneling — not what you want for Royal MCP on a public WordPress site.)
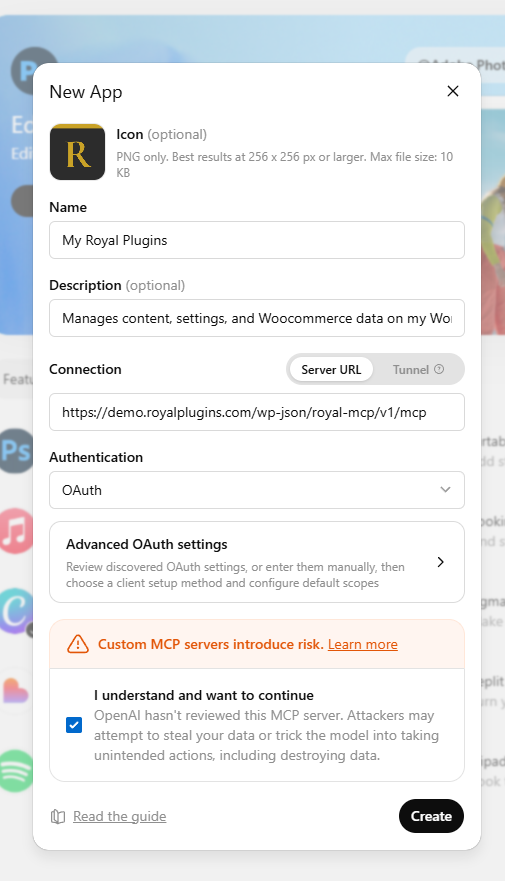
New Plugin dialog with a Royal MCP setup ready to submit. The icon is optional; everything else above is required, including the I understand and want to continue acknowledgment.
Click Create
Set Authentication to OAuth (default). The Advanced OAuth settings row will show “Review discovered OAuth settings” once you’ve entered a valid URL — that means ChatGPT successfully auto-discovered Royal MCP’s OAuth metadata and you don’t need to configure anything manually. Then check the mandatory I understand and want to continue box (OpenAI gates Create behind an explicit risk acknowledgment for unverified MCP servers). Click Create. If the URL fails validation, double-check it returns 401 to an unauthenticated request (the correct behavior — means the endpoint exists and is gating access). Run curl -s -o /dev/null -w "%{http_code}\n" https://example.com/wp-json/royal-mcp/v1/mcp from any terminal to verify before retrying.
ChatGPT’s Plugin handles OAuth through Royal MCP’s own OAuth endpoints — you don’t paste a Client ID or Client Secret into ChatGPT. When you click Create, ChatGPT redirects you through Royal MCP’s /authorize → /token flow automatically. (Unlike Claude Desktop, ChatGPT doesn’t currently expose a Custom Headers field, so there’s no API-key bypass path. If OAuth is blocked by a WAF or Cloudflare on your host, see the troubleshooting checklist — the same fixes apply regardless of which AI platform you’re connecting from.)
Approve the OAuth Consent
After you click Create, ChatGPT redirects you through Royal MCP’s OAuth consent flow. This is identical to the Claude OAuth flow — Royal MCP’s OAuth server doesn’t care which client is asking.
ChatGPT shows a “Sign in with...” prompt
Before the actual OAuth flow starts, ChatGPT displays a confirmation modal titled Add <your Plugin name> to ChatGPT with a single Sign in with <your Plugin name> button. Three trust notes appear below it: permissions are respected, you’re in control of your data, and connectors may introduce risk. Click Sign in to proceed — this is when ChatGPT actually opens the OAuth handshake with your WordPress site.
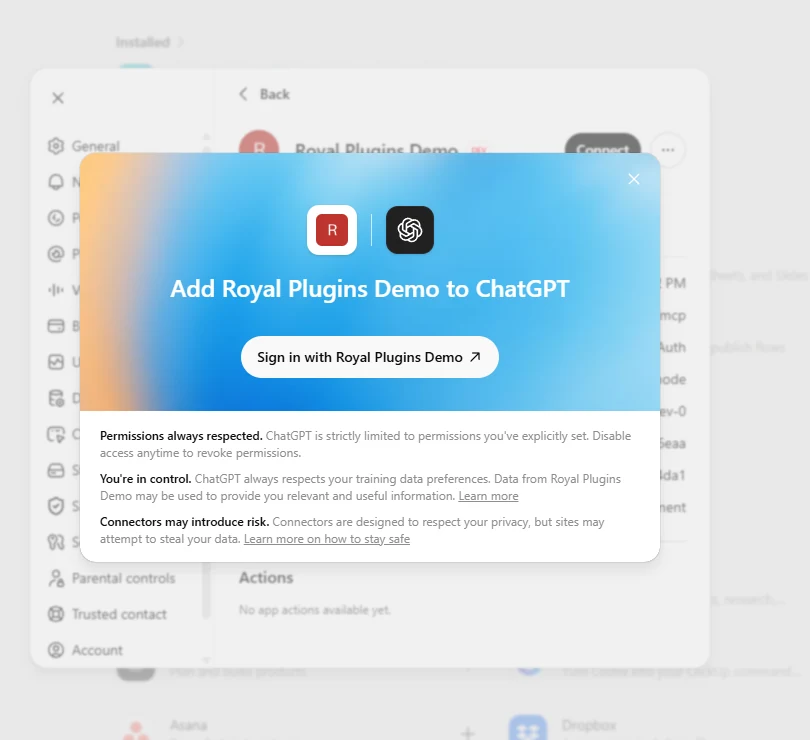
ChatGPT’s pre-OAuth confirmation modal. Nothing has happened yet on your WordPress site — the OAuth flow starts when you click Sign in.
Browser opens the consent screen on your WordPress site
A new browser tab loads https://example.com/authorize?... (your domain). You’ll see your site name, the application requesting access (ChatGPT), and the specific actions Royal MCP will allow it to perform on your behalf — reading posts/pages/media, creating and editing content, managing categories/tags/menus, and viewing site settings + user info.
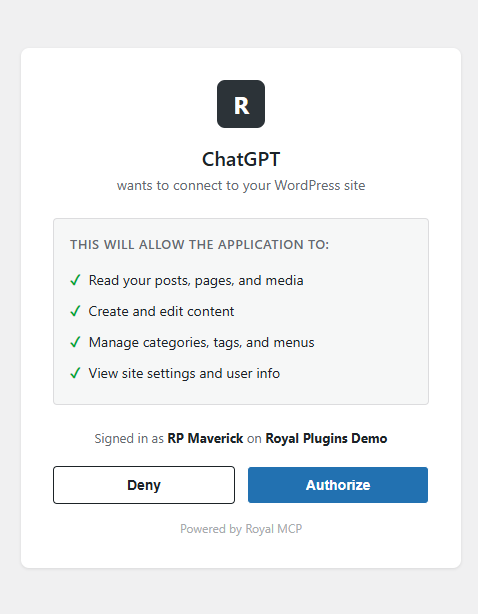
Royal MCP’s OAuth consent screen. The permissions listed are the same scopes Royal MCP grants to any MCP client — ChatGPT, Claude, or otherwise — via the mcp:full scope.
Click Authorize
Royal MCP issues an access token, returns it to ChatGPT, the consent tab closes automatically.
Back in ChatGPT — Plugin is marked active
Return to the ChatGPT Settings → Plugins panel. Your new Plugin now appears in the list with a Connected state. Clicking it opens the Plugin detail view: a Connection row identifying the Plugin, a Permissions row (defaults to “Allow low-risk actions” — we cover this in the next section), and an Actions list showing every MCP tool Royal MCP exposes with its input schema and risk tags. You’re ready to use it in conversations — but before you do, set the permissions level (next section).
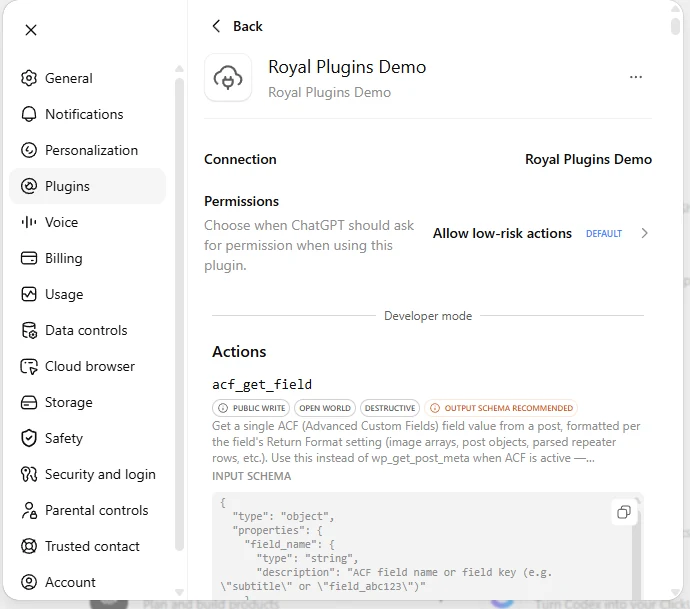
Plugin detail view post-connection. Every Royal MCP tool is listed in Actions with its input schema and risk classification — ChatGPT reads these to decide when to invoke each tool. The yellow “OUTPUT SCHEMA RECOMMENDED” badges are OpenAI’s soft quality warning for tools that don’t declare an output schema; it’s not a functional block and doesn’t affect how tools work.
Open Royal MCP → Activity Log in a separate browser tab before clicking Create in ChatGPT. You’ll see live entries fire as the OAuth handshake progresses (oauth:register → oauth:authorize → oauth:token). If anything fails, the Activity Log shows you which step + the exact reason — that’s the single most useful diagnostic Royal MCP gives you.
Set the Plugin’s Permissions
ChatGPT’s Plugins UI added a per-Plugin Permissions setting that controls when ChatGPT asks you to approve an action. It’s a new addition (was not present in the earlier Custom Apps UI) and worth setting explicitly — the default may not match how you want to use Royal MCP.
Open the Plugin’s Permissions row
From Settings → Plugins, click your Royal MCP Plugin, then click the Permissions row (or scroll to it in the detail view). You’ll see four options.
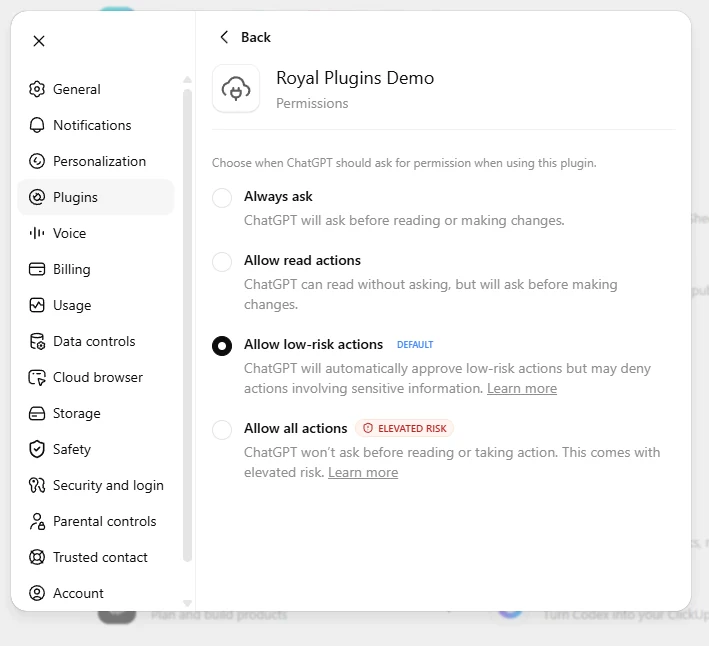
The per-Plugin Permissions screen. Default is “Allow low-risk actions.”
Pick the level that matches how you want to work
The four levels, in ascending trust:
- Always ask — ChatGPT asks for confirmation on every Royal MCP action, read or write. Most cautious. Slows down workflow but no surprises.
- Allow read actions — ChatGPT reads (posts, pages, settings, products) without asking, but confirms before creating/editing/deleting. Good default for content review + analysis workflows.
- Allow low-risk actions (DEFAULT) — ChatGPT decides which actions are “low risk” and executes those without asking; asks for anything it flags as sensitive. Reasonable middle ground, but note ChatGPT makes the judgment call about what counts as low-risk.
- Allow all actions (ELEVATED RISK) — no confirmation prompts at all. ChatGPT can create, update, delete without asking. Fastest workflow for “AI is my publishing assistant” use cases, but you should only pick this if you trust your own prompts + have backups (SiteVault handles that).
Note: on Plus / Pro tiers, ChatGPT can’t perform write actions regardless of what you pick here — the plan-tier gate is upstream of this setting. On Business+ tiers, this setting actually controls the approval flow.
For most Royal MCP use cases, Allow read actions is the safest choice on paid personal tiers, and Allow low-risk actions is a reasonable default on Business+ — but if you’re running an agentic workflow (ChatGPT publishes drafts, updates products, etc.) and want the least friction, Allow all actions with a fresh SiteVault backup before you start is the fastest path. You can change this any time from Settings → Plugins.
Use Royal MCP in Conversations
Plugins aren’t auto-included in every chat — you toggle them on per-conversation via the message composer.
Open a new conversation
Start a fresh chat in ChatGPT.
Click the + button next to the message composer
The + button is to the left of the input field. Click it to open the tools menu.
Click More → pick your Royal MCP Plugin
Expand the More section and find your Royal MCP Plugin in the list. Click it to add the Plugin to the current conversation’s context.
Ask ChatGPT to do something
The Plugin is now available for the rest of this conversation. Try: “What’s the title and tagline of my site?” — ChatGPT will invoke wp_get_site_info and respond with your actual site data.
You’ll re-add the Plugin each time you start a fresh conversation (via the + → More menu). Some ChatGPT tiers expose a way to pin frequently-used Plugins as a default; check your Settings → Plugins for a “Default to all chats” option on each Plugin card.
Once you’ve added the Plugin on ChatGPT web, it’s automatically available in the ChatGPT mobile apps (iOS / Android) and the ChatGPT desktop apps (macOS / Windows) on the same account. No re-configuration needed.
Verify It’s Working
A few first commands to confirm the connection. These all use read actions, so they work on every supported plan tier:
- “What’s the title and tagline of my site?” → calls
wp_get_site_info, returns your site title, description, language, WordPress version. - “List my five most recent published posts.” → calls
wp_get_postswith a status filter. - “What plugins are installed and which ones have updates available?” → calls
wp_get_plugins.
If ChatGPT responds with your site-specific data, you’re connected. If you get a generic “I don’t have access to that” response, the Plugin isn’t toggled on in this conversation — go back to the + → More menu and add it.
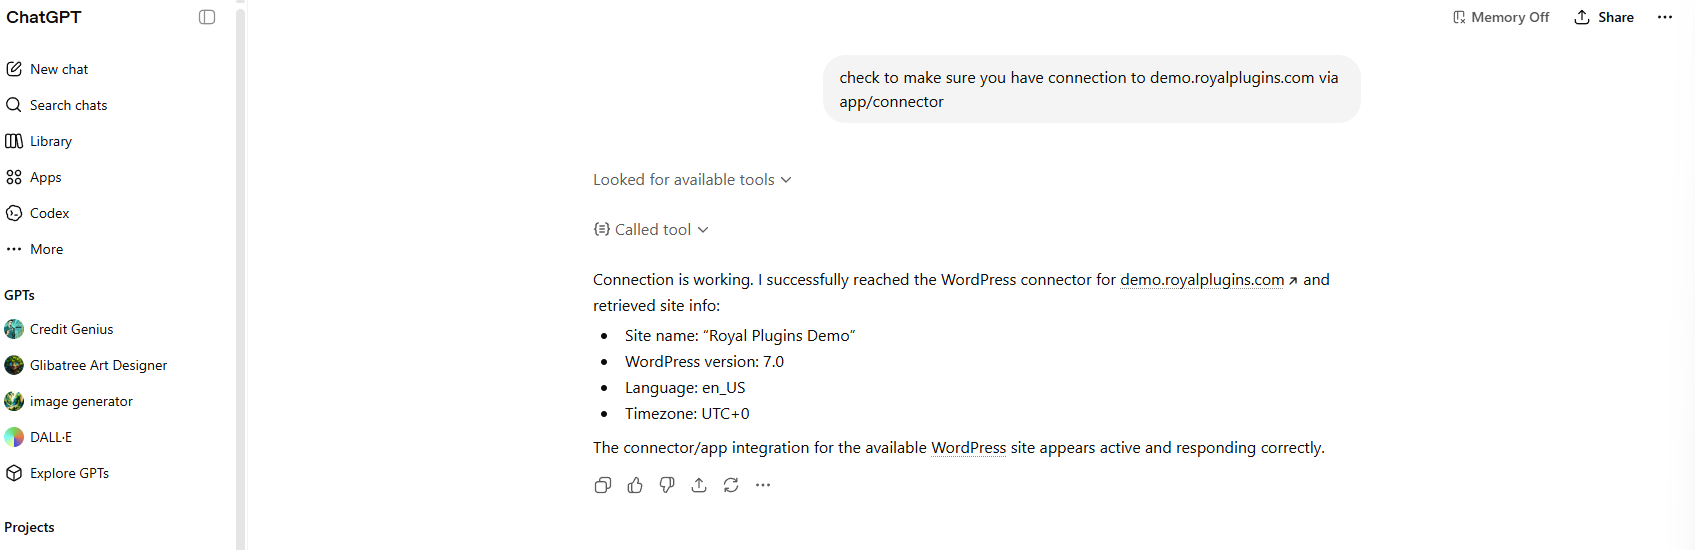
ChatGPT calls wp_get_site_info and reports back the site’s actual metadata — confirming end-to-end the OAuth handshake, the Plugin wiring, and Royal MCP’s tool invocation are all working.
For Business / Enterprise / Edu plans — write actions
If you’re on a tier with write support, try:
- “Create a draft post titled ‘Test from ChatGPT’ with body ‘This is a test.’” → calls
wp_create_post. ChatGPT asks for manual confirmation before executing (unless you’ve enabled approval memory for this connector in conversation settings).
If write actions silently fail with a generic error on Plus or Pro, that’s the plan tier gate — not a Royal MCP issue. The fix is upgrading to Business tier or higher (or switching to Claude.ai, which has no such gate).
If Something Goes Wrong
ChatGPT-specific issues + the cross-platform issues that affect any OAuth-based MCP setup:
| Symptom | Likely cause | Fix |
|---|---|---|
| Developer Mode toggle doesn’t appear in Plugins → Advanced settings | Free tier OR org admin disabled it | Upgrade plan / contact org admin |
| Create button rejects the Server URL | URL not reachable from public internet (localhost / private IP / blocked) | Verify Royal MCP endpoint resolves externally via curl |
| OAuth consent screen never appears after Create | Browser popup blocker, OR your host returned an error on /authorize |
Disable popup blockers; check Royal MCP Activity Log for the failure |
| Consent screen appears but Authorize button does nothing | OAuth callback URL mismatch, or host-side CORS issue | See troubleshooting hub |
| Plugin created but “Couldn’t reach the MCP server” when used | Almost always shared-hosting WAF blocking the inbound MCP request | Same fixes as Claude side — see troubleshooting hub |
| “Unknown error” shown briefly after Authorize, but Settings → Plugins shows the Plugin as connected | Known ChatGPT-side UX quirk during the final OAuth callback — the handshake actually completed successfully | Ignore the error message. Verify in Settings → Plugins that your Royal MCP Plugin appears in the list with a Connected on date. If it does, you’re good. If the Plugin didn’t appear, start over from the New Plugin dialog. |
| Write actions silently fail on Plus / Pro plan | Plan tier gate — write actions require Business+ on ChatGPT | Upgrade tier OR use Claude.ai (no tier gate) |
| ChatGPT keeps asking to confirm every action | Plugin’s Permissions is set to “Always ask” or “Allow read actions” | Settings → Plugins → your Royal MCP Plugin → Permissions — change to Allow low-risk actions or Allow all actions. See the Set Permissions section above. |
| Plugin works in chat but ChatGPT doesn’t use it | Description field too generic — ChatGPT can’t tell when to invoke it | Edit the Plugin, add a more specific description naming what your site contains (“blog content, product catalog, customer orders”) |
For any OAuth-flow failure that isn’t ChatGPT-specific (Cloudflare Zero Trust hijack, SiteGround .well-known/ 404, ModSecurity 406, etc.) — the troubleshooting start-here page covers all of them. The fixes work across Claude, ChatGPT, and any other MCP client.
Claude vs ChatGPT — When to Use Which (or Both)
Royal MCP supports both Claude and ChatGPT simultaneously — same WordPress site, same plugin, no extra license, no per-platform limit. You don’t have to choose. But the experience differs:
| Claude.ai (web + Desktop) | ChatGPT | |
|---|---|---|
| Plugins (formerly Custom Apps / Connectors) on Free tier | Yes | No — paid tier required |
| Write actions on individual paid tier | Yes | Limited (Plus/Pro = read-only) |
| API-key bypass (skip OAuth entirely) | Yes (Claude Desktop) | No — OAuth-only currently |
| Setup complexity | Single dialog | Settings toggle + Plugin dialog + permissions setting |
| Mobile sync | Yes | Yes |
Our honest take: Claude.ai is currently the better-fit platform for Royal MCP because it doesn’t gate write actions behind a tier upgrade and supports the API-key bypass for OAuth-blocked hosts. ChatGPT works fine for read / analysis use cases (monthly content audits, SEO reporting, WooCommerce sales summaries on Plus or Pro), but for “AI publishes my blog post” workflows on a personal account, Claude is the easier path until OpenAI lifts the tier gate.
Many users run both at once and pick whichever fits the task.
Still Stuck? Two Support Paths
If you’ve worked through the checklist and your connection still fails:
Community Support (free) — wp.org Plugin Forum
Post a new thread at wordpress.org/support/plugin/royal-mcp/. The Royal Plugins team monitors the forum regularly. Include the diagnostic info below.
Premium Support (paid) — direct one-on-one help
For priority response (24-hour SLA) and hands-on diagnostic help, our Premium Support tier is $149/year. Direct email, full refund if we can’t resolve your issue.
Information to include in your post or ticket
- Which ChatGPT plan you’re on (Plus / Pro / Team / Business / Enterprise / Edu).
- Which step failed (Developer Mode toggle missing, Server URL rejected, OAuth consent didn’t appear, consent succeeded but ChatGPT can’t reach the server, etc.).
- Screenshot of the Activity Log in Royal MCP with the most recent
oauth:*rows visible, View Details expanded on the failing row. - The exact error message ChatGPT shows.
- Your hosting provider and whether Cloudflare is in front of the site.