Royal MCP OAuth Connector — Deep Dive
What makes Royal MCP different from every other WordPress MCP plugin: it ships a complete OAuth 2.0 authorization server as the primary way to connect. Most WordPress MCP plugins hand out a static API key and hope for the best. Royal MCP lets Claude, ChatGPT, Perplexity, and any other OAuth-capable AI agent add your site as a native connector, the same way they add Google Drive or GitHub. The user clicks “Add Connector,” signs in through WordPress, approves a consent screen, and the connection is live. No copy-pasted secrets, no static tokens sitting in a config file, per-user consent that other admins can revoke, and dynamic client registration so no manual app setup is required. This page covers how that flow works end to end, the security properties, setup steps, and every known failure mode with its fix.
How the OAuth flow works
When Claude Desktop (or another OAuth-capable MCP client) adds Royal MCP as a connector, six things happen in sequence:
- The client fetches Royal MCP’s OAuth metadata endpoint at
/.well-known/oauth-authorization-serverto discover the auth flow. - The client registers itself dynamically via RFC 7591 Dynamic Client Registration. No manual app creation required.
- The client redirects you to your WordPress login using the PKCE-secured authorization code flow (per MCP spec 2025-06-18).
- You approve a consent screen showing the permissions the client is requesting.
- Royal MCP issues an access token (SHA-256 hashed at rest) and a refresh token.
- The client uses the access token in the
Authorization: Bearer …header for every subsequent MCP request.
Steps 1 and 2 are the “host layer” concerns. When those succeed, the flow completes reliably. Most OAuth troubleshooting is about getting /.well-known/* and /register reachable through a WAF, edge cache, or membership plugin that’s intercepting them.
Setup in Claude Desktop
Open Claude Desktop settings
Click your profile icon, then Settings → Connectors.
Click “Add Custom Connector”
Enter your MCP server URL: https://yoursite.com/wp-json/royal-mcp/v1/mcp
Authorize in your browser
Claude opens your browser to your WordPress login. Sign in with an admin account.
Approve the consent screen
Royal MCP shows what Claude is requesting. Click Allow to grant access.
Done
The browser closes and Claude Desktop confirms the connector is active. Royal MCP tools now appear in Claude.
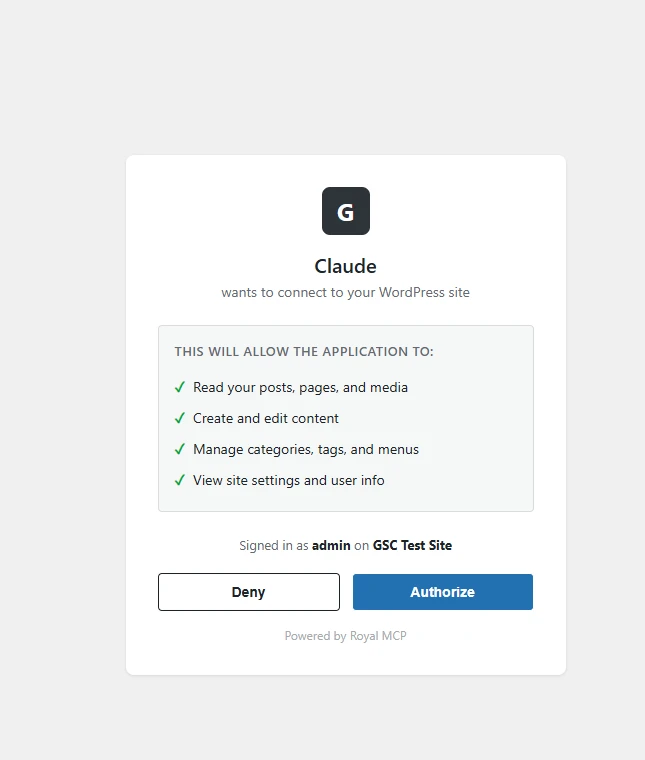
The consent screen Royal MCP presents during the OAuth flow
Security properties
- Access tokens are SHA-256 hashed at rest. The raw token only exists in the client. Your WordPress database holds a hash. A dumped database won’t reveal usable tokens.
- Authorization codes are single-use with a 10-minute expiry. A replay attack against a captured code fails on the second attempt.
- PKCE (S256) is required on every authorization request. Interception of the redirect can’t exchange the code without the code verifier.
- Redirect URI validation enforces localhost or HTTPS. Non-HTTPS remote redirects are rejected.
- Daily cleanup of expired OAuth tokens runs via a WordPress scheduled event.
- Standard WordPress capabilities apply to every tool call the client makes after auth. OAuth gives the client the ability to act; capability checks govern what those actions can do.
For the full auth model, per-transport boundary rules, threat scenarios, and a production-readiness checklist for security and agency teams, see the Direct-Connect Threat Model.
When OAuth beats an API key (and when it doesn’t)
OAuth is the right choice when your client supports it and the OAuth discovery flow reaches your site cleanly. It gives you per-session tokens, automatic refresh, no static secret in a config file, and per-user consent that other admins can revoke. Prefer it for Claude Desktop, Claude.ai Web, and ChatGPT’s Custom GPT MCP connector.
The API-key path (see API Keys) beats OAuth when:
- Your client doesn’t implement OAuth (LM Studio, older Continue, most stdio-only clients).
- Your host actively blocks the OAuth discovery endpoint and won’t stop after every fix in the failure-mode list below.
- You’re running machine-to-machine tests, CI pipelines, or curl-based debugging.
- You want a single stable token that survives client reinstalls.
If OAuth setup fails
OAuth depends on the client reaching three URLs on your site: /.well-known/oauth-authorization-server, /.well-known/oauth-protected-resource, and /wp-json/royal-mcp/v1/mcp. On most hosts this just works. On a few managed hosts, nginx rules and edge caches can short-circuit those URLs before WordPress sees them, and the client shows a generic “Couldn’t connect” or “Authorization failed” error. Every known failure mode has a dedicated fix:
- Royal MCP on SiteGround: The Complete Setup Playbook — if you’re on SiteGround specifically, the three most common host-layer issues stack together in a known pattern. This playbook sequences them in the correct order.
- OAuth Fails on Managed Hosts (SiteGround, o2switch, LiteSpeed) — edge caches poisoning the OAuth endpoints.
- Imunify360 Blocks Royal MCP OAuth Discovery — CloudLinux bot-protection intercepts
/wp-json/*and/.well-known/*. Auto-detected 1.4.36+. - Sucuri / CloudProxy Blocks Royal MCP OAuth Discovery — edge firewall returns 404 before your origin sees the request. Auto-detected 1.4.41+.
- Plain Permalinks Break OAuth Discovery — WordPress permalinks set to Plain disables the rewrite rules that make OAuth endpoints reachable. Auto-detected 1.4.36+.
- SiteGround Returns 404 for /.well-known/ — nginx layer reserves the path prefix.
- Fix /.well-known/ Content-Type with a Cloudflare Transform Rule — static files return 200 but with the wrong MIME type.
- OAuth Discovery Returns HTML Instead of JSON — a membership plugin or theme template is intercepting the request. Auto-detected 1.4.22+.
- Stale OAuth Discovery Files in Your Webroot — leftover static files from an earlier version’s workaround advertise old endpoint URLs.
- OAuth Endpoints Overlap with Existing Pages — a membership plugin has published a
/registerpage at the same slug OAuth uses. Auto-detected 1.4.40+. - Web Server 301-Redirects /register to /register/ — Nginx or Apache mod_dir adds a trailing slash and OAuth clients don’t follow 301 on POST. Auto-detected 1.4.22+.
- ChatGPT MCP connector fails at Dynamic Client Registration with HTTP 466 (or any 460-469) — a WAF layer is fingerprinting the ChatGPT-flavored DCR POST specifically.
- Connect Claude Desktop via API Key (Skip OAuth) — if only Claude Desktop matters and OAuth won’t cooperate, the
mcp-remotebridge with an Authorization Bearer header sidesteps the flow entirely.