FormForge Pro Documentation
Complete guide to building professional WordPress forms with FormForge Pro. Create contact forms, payment forms, quizzes, surveys, and more with our drag-and-drop builder and 20+ integrations.
Watch the Full Walkthrough
See FormForge Pro in action — drag-and-drop form builder, conditional logic, payment processing, integrations, and more.

Getting Started
FormForge Pro is a professional WordPress form builder that lets you create any type of form with a visual drag-and-drop editor. From simple contact forms to complex payment forms, quizzes, and surveys - FormForge has you covered.
Feature Overview
Drag-and-Drop Builder
Visual form builder with live preview.
30+ Field Types
Text, email, phone, file upload, signature, and more.
Conditional Logic
Show/hide fields based on user input.
Email Notifications
Admin alerts and user confirmations with smart tags.
Stripe & PayPalPRO
Accept payments directly in your forms.
File UploadsPRO
Multi-file, drag-and-drop with type/size validation.
Quiz ModeBUSINESS
Scoring, pass/fail, timed quizzes, leaderboards.
Survey ModeBUSINESS
Likert scales, NPS, star ratings, matrix questions.
PDF GenerationBUSINESS
Auto-generate PDFs from submissions.
CalculationsBUSINESS
Build pricing calculators with formulas.
White LabelAGENCY
Rebrand the plugin for client sites.
Slack IntegrationAGENCY
Real-time form notifications to Slack.
Pricing Tiers
| Tier | Price | Sites | Key Features |
|---|---|---|---|
| Pro | $99/yr | 1 site | All core features, Stripe/PayPal, basic integrations |
| Business | $199/yr | 5 sites | + Quiz, Survey, PDF, Calculations, CRM integrations |
| Agency | $299/yr | 100 Sites | + White Label, Slack, Frontend Entry Editing |
Requirements
- WordPress 5.8 or higher
- PHP 7.4 or higher
- Valid FormForge Pro license
Installation
Download the plugin
Log in to my.royalplugins.com and download the FormForge Pro ZIP file.
Upload to WordPress
Go to Plugins → Add New → Upload Plugin, select the ZIP file, and click Install Now.
Activate the plugin
Click "Activate Plugin" after installation completes.
Enter your license key
Navigate to FormForge → License and enter your license key to unlock all Pro features.
Your forms and settings will be preserved. Just upload the new version over the old one.
License Activation
Your license key unlocks Pro features and enables automatic updates.
Find your license key
Log in to my.royalplugins.com/my-account/licenses/ to view your license keys.
Enter the key
Go to FormForge → License in your WordPress admin, paste your key, and click Activate.
Verify activation
You should see a green "Active" badge. Pro features are now unlocked.
Check for extra spaces in the key. Verify you haven't exceeded your site limit. Make sure your license hasn't expired.
Creating Your First Form
Go to FormForge
Click FormForge → Add New in your WordPress admin.
Choose a template or start blank
Select from 110 pre-built templates across 16 categories (Contact, Payment, Survey, Quiz, and more) or start with a blank form.
Add fields
Drag fields from the left panel onto your form. Click any field to customize its settings.
Configure notifications
Go to Settings → Notifications to set up admin email alerts and user confirmations.
Embed your form
Copy the shortcode (e.g., [royal_form id="1"]) and paste it into any post, page, or widget.
Form Builder
The drag-and-drop form builder makes it easy to create any type of form without touching code.
Builder Interface
- Left Panel: Available field types to drag onto your form
- Center: Your form canvas with live preview
- Right Panel: Field settings when a field is selected
- Top Bar: Save, preview, embed code, and form settings
Form Settings
Click the gear icon to access form-level settings:
- General: Form name, description, submit button text
- Confirmations: Success message or redirect URL after submission
- Notifications: Email notifications for admin and user
- Restrictions: Entry limits, scheduling, user requirements
- Style: Custom CSS, form width, field spacing
Field Types
FormForge Pro includes 30+ field types for any form need.
Standard Fields
- Text Input - Single line text
- Email - Email with validation
- Phone - Phone number with input mask
- Textarea - Multi-line text
- Number - Numeric input with min/max
- Password - Password with strength meter and toggle visibility
- Website/URL - URL with validation
- Date Picker - Calendar date selection
- Time Picker - Time selection
- Select Dropdown - Single or multi-select, searchable
- Radio Buttons - Single choice from options
- Checkboxes - Multiple choice selection
- Hidden Field - Pass data without user input
Advanced Fields
- File Upload - Multi-file, drag-and-drop (Pro)
- Signature - Canvas-based signature capture (Pro)
- Address - Full address with autocomplete (Pro)
- Name - First/last name with prefix/suffix (Pro)
- Rating - Star rating scale (Business)
- Likert Scale - Matrix of radio buttons (Business)
- Net Promoter Score - 0-10 NPS question (Business)
- Payment - Credit card with Stripe/PayPal (Pro)
Layout Fields
- HTML/Content - Custom HTML, images, instructions
- Section Divider - Visual separator with title
- Page Break - Create multi-page forms
- Columns - Side-by-side field layout
Conditional Logic
Show or hide fields based on user input to create dynamic, personalized forms.
Setting Up Conditional Logic
Select a field
Click on the field you want to show/hide conditionally.
Open conditional logic
Go to the Logic tab in the field settings panel.
Enable and configure
Toggle "Enable Conditional Logic" and set your rules.
Rule Options
- Show/Hide: What action to take when conditions are met
- All/Any: Whether ALL conditions must match or just ANY one
- Field: Which field to check
- Operator: is, is not, contains, starts with, ends with, greater than, less than, is empty, is not empty
- Value: The value to compare against
Example: Show field based on dropdown selection
If you have a dropdown "How did you hear about us?" with option "Other", you can show a text field only when "Other" is selected:
- Action: Show this field
- If Any of these rules match:
- Field: "How did you hear about us?" is "Other"
You can chain multiple conditions and apply conditional logic to entire pages in multi-page forms.
Email Notifications
Send automatic emails when forms are submitted - both to yourself and to users.
Admin Notification
Get notified whenever someone submits your form:
- To: Your email or multiple addresses (comma-separated)
- Subject: Use smart tags like
{form_name}or field values - Message: Include all submitted data with
{all_fields}
User Confirmation
Send a confirmation email to the person who submitted:
- To: Use the email field with
{field:email} - Subject: "Thanks for your submission!"
- Message: Confirm their details and next steps
Smart Tags
| Tag | Description |
|---|---|
{all_fields} |
All submitted field values |
{field:field_name} |
Specific field value |
{form_name} |
Name of the form |
{entry_id} |
Submission ID number |
{date} |
Current date |
{admin_email} |
Site admin email |
{site_name} |
Website name |
Most hosting providers block PHP mail. Install an SMTP plugin like WP Mail SMTP and configure with Gmail, SendGrid, or your email provider for reliable delivery.
Spam Protection
Multiple layers of protection to keep spam submissions out.
Honeypot (Enabled by Default)
Invisible field that catches bots. No user interaction required. Works automatically on all forms.
reCAPTCHA v2 (Checkbox)
Get API keys
Go to Google reCAPTCHA Admin and register your site. Choose "reCAPTCHA v2 - Checkbox".
Enter keys in settings
Go to FormForge → Settings → reCAPTCHA and paste your Site Key and Secret Key.
Add to your form
Drag the "reCAPTCHA" field onto your form where you want the checkbox to appear.
reCAPTCHA v3 (Invisible)
Runs in the background with no user interaction. Scores visitors 0.0-1.0 based on behavior. Recommended for most sites.
- Choose "reCAPTCHA v3" when registering at Google
- Set score threshold (0.5 recommended) - lower = stricter
- No field needed - applies automatically to all forms
hCaptcha
Privacy-focused alternative to Google reCAPTCHA. Setup is similar - get keys from hcaptcha.com.
File Uploads
Accept file uploads with drag-and-drop, multiple files, and validation.
Field Settings
- Allowed Types: Specify extensions (jpg, png, pdf, doc, etc.)
- Max File Size: Per-file limit in MB
- Max Files: How many files can be uploaded
- Required: Whether at least one file must be uploaded
Storage
Files are stored in wp-content/uploads/formforge/ with randomized filenames for security. Files are associated with the entry and can be downloaded from the Entries screen.
Check your server's PHP settings: upload_max_filesize, post_max_size, and max_execution_time may need to be increased in php.ini or .htaccess.
Multi-Page Forms
Break long forms into manageable steps with progress indicators.
Creating Multi-Page Forms
Add Page Break fields
Drag "Page Break" fields to divide your form into pages.
Configure page titles
Click each Page Break to set the page title shown in the progress bar.
Set button text
Customize "Next" and "Previous" button labels for each page.
Progress Bar Styles
- Steps: Numbered circles showing current position
- Bar: Horizontal progress bar with percentage
- None: Hide progress indicator
Page Validation
By default, required fields on each page are validated before allowing the user to proceed. They cannot skip to the next page without completing required fields.
Save & Continue PRO
Let users save their progress on long forms and resume later from any device. The form state is stored against a resume token and can be sent to the user by email.
Enabling Save & Continue
Edit your form
Open the form in the visual builder and go to Settings.
Toggle Save & Continue
Enable Save & Continue. A "Save and continue later" link appears below the form.
Configure delivery
Choose whether to display the resume link on screen, email it to the user, or both.
How Users Resume
When a user clicks "Save and continue later", FormForge generates a unique resume token. They can either copy the URL or have it emailed. Opening the link reloads the form with every field pre-filled exactly where they left off.
Saved progress is kept for 30 days by default, after which it's cleaned up automatically by a daily WordPress cron event.
Partial Entries PRO
Capture data from users who start filling out a form but never submit. Partial entries record what was typed and which field was last touched, so you can follow up on abandoned submissions.
How It Works
As a user types, FormForge tracks their session and stores field values in the background. If they leave the page without submitting, the data stays available in the Entries screen as a "Partial" entry. If they later complete and submit the form, the partial is automatically promoted to a full entry.
Viewing Partial Entries
- Go to FormForge → Entries
- Use the status filter to switch to Partial
- Click any partial to see the captured fields and the last field the user interacted with
Partial entries often include email addresses entered before abandonment. Use them for follow-up campaigns to recover incomplete leads. Old partial entries are auto-cleaned daily.
Form Scheduling PRO
Control when a form is available to submit by setting a start date, end date, or both. Useful for event registrations, application windows, and time-limited offers.
Setting a Schedule
Open form settings
Edit your form and find the Scheduling section in Settings.
Enable scheduling
Toggle it on, then set a start date, an end date, or both. Times use your WordPress site timezone.
Customize unavailable messages
Set separate messages for "Not yet open" and "Closed" so users know exactly why they can't submit.
Behavior Outside the Window
Before the start date, the form is replaced with your "Not yet open" message. After the end date, the form is replaced with your "Closed" message. The form is never rendered as a fillable form outside the scheduled window, so users can't bypass it client-side.
Entry Limits PRO
Cap the total number of submissions a form can accept, or limit how many times a single user or IP can submit. Useful for limited-quantity sales, contest entries, and one-per-person registrations.
Limit Types
- Total entries: Hard cap on submissions for the whole form. Once hit, the form closes.
- Per user: Limit how many times each logged-in user can submit.
- Per IP: Limit submissions per IP address (useful for guest forms).
Configuring Limits
- Edit your form → Settings → Entry Limits
- Enable the limit type you need and enter a maximum
- Customize the message users see once the limit is reached
Only completed entries count toward limits — partial entries and abandoned sessions don't. Limits can be combined with Form Scheduling for tight control over registration windows.
Dynamic Field Population PRO
Pre-fill any field with data pulled from URL parameters, the logged-in user's profile, the current post, query vars, cookies, or a custom filter. Great for tracking campaigns, personalizing forms, and reducing typing for known users.
Population Sources
| Source | Example Use |
|---|---|
| URL Parameter | Pre-fill a referral code from ?ref=summer25 |
| User Meta | Pull a custom user meta key (e.g. company name) |
| User Data | Pre-fill name and email from the logged-in WP user |
| Post Meta | Pull a value from the post the form is embedded on |
| Query Var | Pull a registered WP query variable |
| Cookie | Pre-fill from a tracking or session cookie |
| Custom Filter | Pull from any source via rfp_custom_population |
Configuring a Field
- Click the field in the builder
- Go to Advanced → Dynamic Population
- Enable population, choose a source, and enter the parameter name (e.g.
reffor the URL?ref=...)
Populated values appear as the default — users can change them before submitting. If you need to lock a value, mark the field as read-only.
Stripe Setup
Accept credit card payments directly in your forms with Stripe.
Connect Stripe
Get API keys
Log in to Stripe Dashboard → Developers → API Keys. Copy your Publishable key and Secret key.
Enter keys
Go to FormForge → Settings → Payments → Stripe. Paste both keys and save.
Enable in your form
Edit your form, go to Integrations → Payment Collection, and enable Stripe. The card fields won't appear until this is turned on.
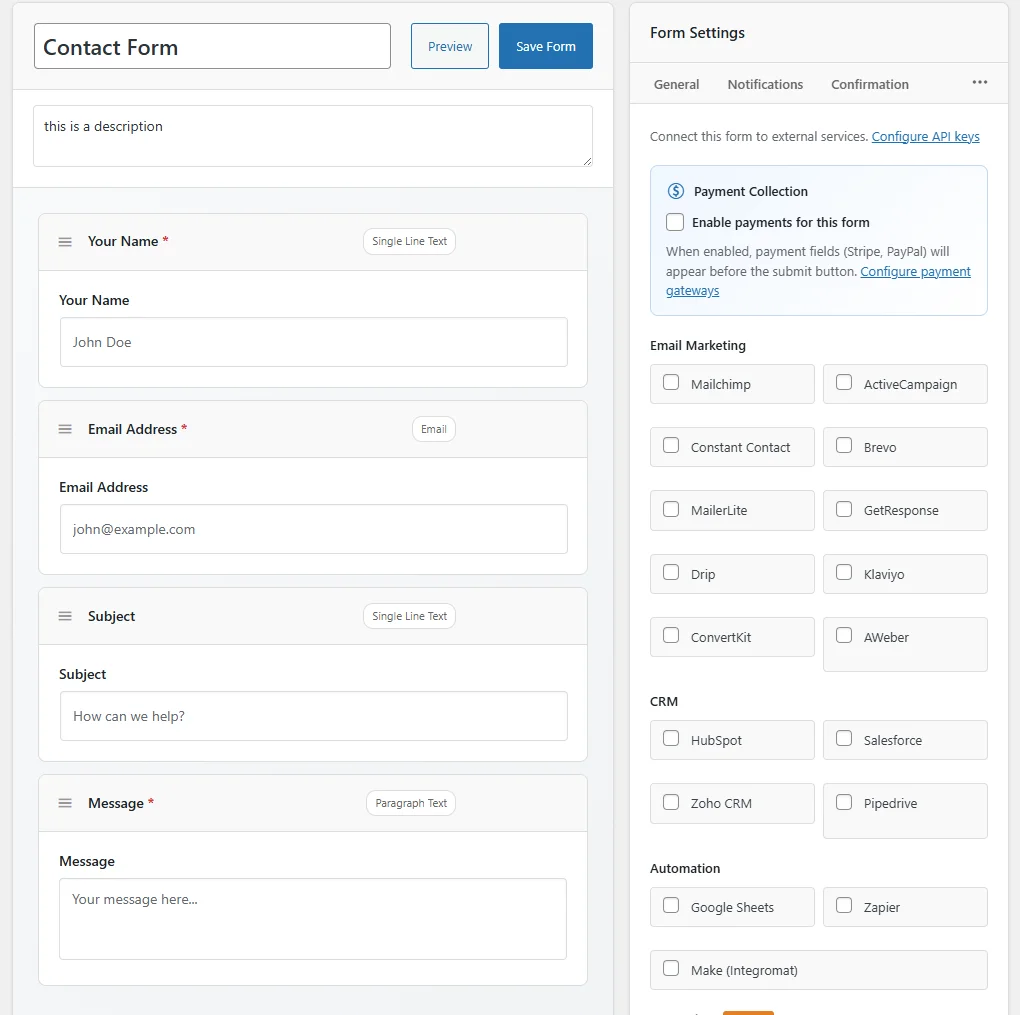
Configure webhook (recommended)
In Stripe Dashboard, create a webhook pointing to your site's webhook URL (shown in settings). This ensures payment confirmations even if the browser closes.
Test Mode
Use test API keys (start with pk_test_ and sk_test_) during development. Test card: 4242 4242 4242 4242, any future date, any CVC.
Switch to live API keys (start with pk_live_ and sk_live_) when ready to accept real payments. Don't forget to update the webhook too.
PayPal Setup
Accept PayPal payments and credit cards via PayPal's payment buttons.
Connect PayPal
Create PayPal app
Go to PayPal Developer Dashboard and create a new REST API app.
Get credentials
Copy the Client ID and Secret from your app settings.
Enter in FormForge
Go to FormForge → Settings → Payments → PayPal. Paste credentials and select your mode (Sandbox/Live).
Enable in your form
Edit your form, go to Integrations → Payment Collection, and enable PayPal. The payment button won't appear until this is turned on.
Sandbox Testing
Use sandbox credentials and sandbox test accounts during development.
Creating Payment Forms
Fixed Amount Payment
- Add a "Payment" field to your form
- Set payment type to "Fixed Amount"
- Enter the amount (e.g., 49.99)
- Choose currency (USD, EUR, GBP, etc.)
Variable Amount (User Chooses)
- Add a "Number" or "Dropdown" field for amount selection
- Add a "Payment" field
- Set payment type to "Field Value"
- Select the field containing the amount
Product Selection
- Add a "Checkbox" or "Dropdown" field with products/prices
- Use the format:
Product Name|19.99 - Enable "Calculate total from selected options"
- Add a "Payment" field set to use the calculated total
After successful payment, the entry is marked as "Paid" with transaction ID. You can filter entries by payment status in the Entries screen.
More Payment Gateways BUSINESS
Beyond Stripe and PayPal, FormForge Pro Business adds three more gateways for regions and businesses where Stripe or PayPal isn't a fit.
Available Gateways
Square
Take card payments through Square's checkout. Useful for businesses already running Square POS in-store.
Mollie
European-focused gateway with iDEAL, Bancontact, SEPA, and most EU payment methods.
Authorize.Net
Long-standing US gateway favored by merchants with existing Authorize.Net accounts.
Connecting a Gateway
Get API credentials
Pull the keys from your Square, Mollie, or Authorize.Net dashboard. Each gateway has its own credentials format — the FormForge settings screen labels each field.
Enter in FormForge
Go to FormForge → Settings → Payments and paste credentials into the matching gateway panel. Each gateway has its own Test/Live mode toggle.
Enable per form
Edit your form, go to Integrations → Payment Collection, and pick the gateway. The fixed/variable/product amount setup works the same as Stripe and PayPal.
Square, Mollie, and Authorize.Net are part of the Business tier. Stripe and PayPal remain available on Pro.
Quiz Mode BUSINESS
Transform your forms into interactive quizzes with automatic scoring, grades, and leaderboards.
Enabling Quiz Mode
Edit your form
Open the form in the visual builder.
Go to Settings
Click the Settings tab and find the Quiz Settings section.
Enable Quiz Mode
Toggle Enable Quiz Mode ON and configure your options.
Quiz Settings
| Setting | Description | Default |
|---|---|---|
| Pass Percentage | Score needed to pass (0-100) | 70% |
| Show Grade | Display letter grade (A-F) | Yes |
| Show Answers | Show results per question | Yes |
| Show Correct Answers | Reveal correct answers on wrong responses | Yes |
| Show Explanations | Display answer explanations | Yes |
Setting Up Quiz Questions
Each field can be a quiz question:
- Click on a field (text, radio, checkbox, dropdown, etc.)
- Go to Advanced tab
- Find Quiz Answer section
- Enter the Correct Answer
- Set Points (default: 1)
- Optionally enable Partial Credit
- Add Explanation (shown in results)
Scoring System
Each question has configurable points (default: 1). Total score = earned points / total points × 100. The percentage determines pass/fail and letter grade.
| Percentage | Grade |
|---|---|
| 90-100% | A |
| 80-89% | B |
| 70-79% | C |
| 60-69% | D |
| Below 60% | F |
Leaderboard
Display top scorers on your site by enabling Show Leaderboard in quiz settings, then add this shortcode to any page:
[royal_form_leaderboard form_id="123" limit="10"]
Use clear, unambiguous questions. Add explanations to help users learn from mistakes. Set an appropriate passing score (70% is standard). Test thoroughly to verify all answers work correctly.
Survey Mode BUSINESS
Create professional surveys with specialized field types for collecting feedback and opinions.
Survey Field Types
Likert Scale
Classic agree/disagree scale for measuring attitudes. Presets: Agreement, Satisfaction, Frequency, Importance, Likelihood.
Star Rating
Visual rating with configurable stars (up to 10), half-star support, and custom icons/colors.
NPS (Net Promoter Score)
Industry-standard 0-10 scale: Promoters (9-10), Passives (7-8), Detractors (0-6).
Matrix/Grid
Multiple questions with shared answer options. Radio (single) or Checkbox (multiple) per row.
Opinion Scale
Numeric scale with customizable endpoints and labels (e.g., "Poor" to "Excellent").
Ranking
Drag-and-drop ordering of items by preference.
Viewing Survey Results
Go to FormForge → Analytics and select your survey form. Statistics shown include:
- Star/NPS/Opinion: Average, min, max, distribution
- Likert: Response distribution per option
- Matrix: Heatmap of responses
- Ranking: Average position per item
Keep surveys to 5-10 questions. Ask one topic per question (avoid double-barreled questions). Use balanced scales with equal positive/negative options. Include "N/A" or "Neutral" when appropriate.
Conversational Forms BUSINESS
Create engaging, Typeform-style forms that display one question at a time for a focused user experience.
Enabling Conversational Mode
Edit your form
Open the form in the visual builder.
Go to Settings → Display Mode
Find the Display Mode section.
Enable Conversational Mode
Toggle it ON and configure theme settings (background color, text color, accent color, progress bar).
Navigation
- Enter: Go to next question
- Escape: Exit conversational mode
- Arrow keys: Navigate radio/checkbox options
- Letter shortcuts (A, B, C, D): Quick selection for choice fields
When to Use Conversational Mode
Good For
Lead generation, sign-up flows, simple contact forms, application forms, one-on-one feel.
Not Ideal For
Complex multi-page forms, forms requiring context from multiple fields, data entry, payment forms.
PDF Generation BUSINESS
Automatically generate professional PDF documents from form submissions.
Enabling PDF Generation
Auto-Generate for All Submissions
Go to form Settings → PDF and toggle Auto-Generate PDF ON.
Attach PDF to Email Notifications
Go to Settings → Notifications, edit a notification, and enable Attach PDF.
PDF Settings
| Setting | Description |
|---|---|
| Title | PDF document title (defaults to form title) |
| Logo URL | Company logo image URL for header |
| Accent Color | Color for headers and borders |
| Page Size | A4, Letter, Legal, etc. |
| Orientation | Portrait or Landscape |
| Password | Optional password protection |
PDF Content
Generated PDFs include header (logo, form title), meta information (submission ID, date/time, user info), all submitted field values in table format, and optional footer with custom text.
Downloading PDFs
Go to FormForge → Entries, click on an entry, and click Download PDF button. Users can also receive tokenized download links in confirmation emails.
Calculations BUSINESS
Build pricing calculators, order forms, and computed fields with formulas.
Setting Up Calculated Fields
Add a Number or Total field
This will display the calculated result.
Enable Calculation
In field settings, toggle Enable Calculation ON.
Enter your formula
Use field references like {field_id} with operators.
Formula Syntax
| Operator | Description | Example |
|---|---|---|
+ |
Addition | {a} + {b} |
- |
Subtraction | {a} - {b} |
* |
Multiplication | {a} * {b} |
/ |
Division | {a} / {b} |
( ) |
Grouping | ({a} + {b}) * {c} |
Examples
- Simple total:
{product_price} * {quantity} - Subtotal with tax:
{subtotal} + ({subtotal} * 0.08) - Conditional pricing:
{base_price} + ({add_insurance} * 50)
Use clear field IDs for readable formulas. Test all combinations to verify math. Division by zero returns 0. Results automatically round to 2 decimals with currency formatting.
User Registration BUSINESS
Create WordPress user accounts directly from form submissions. Useful for member onboarding, course signups, and custom registration flows that don't fit WP's built-in registration form.
Enabling User Registration
Open form settings
Edit the form and find the User Registration section in Settings.
Map required fields
Map your form's email field to Email. Optionally map fields to Username, Password, First Name, Last Name, and Display Name. If username or password isn't mapped, FormForge generates them.
Pick a role
Choose the WordPress role new users get (Subscriber by default). Don't grant Editor or Administrator from public forms.
Duplicate Handling
If a user with the same email already exists, FormForge can either skip user creation (and still record the entry) or surface an error to the submitter, depending on the Skip if user exists toggle.
Public registration forms should always include CAPTCHA or another spam-protection method. Auto-generated passwords are emailed via the standard WordPress new-user notification.
Post Creation BUSINESS
Turn form submissions into WordPress posts, pages, or custom post types. Common uses: front-end submissions, classified listings, directory entries, and user-generated content workflows.
Enabling Post Creation
Open form settings
Edit the form and find the Post Creation section in Settings.
Map post fields
Map a form field to Title (required), and optionally Content and Excerpt.
Choose post type and status
Pick the post type (post, page, or any registered CPT) and the initial status — typically Draft or Pending Review so you can moderate before publishing.
Author Assignment
If the submitter is logged in, the post is authored by them. For guest submissions, the post is authored by the default user you configure in form settings.
For public-facing forms, leave post status as Draft or Pending Review. This gives editors a chance to vet user-submitted content before it goes live.
Email Marketing Integrations
Add form submitters straight into your email marketing lists. FormForge Pro ships with eight first-class integrations split across tiers, plus optional AWeber and ConvertKit drop-ins.
Pro Tier (4 providers)
Mailchimp
Add subscribers to any audience, with tag and merge field mapping.
Constant Contact
Sync contacts to lists via OAuth-authenticated API.
Brevo (Sendinblue)
Push contacts into Brevo lists with attribute mapping.
MailerLite
Add subscribers to groups with custom field mapping.
Business Tier (4 more providers)
ActiveCampaign
Create or update contacts and assign tags or automations.
GetResponse
Add contacts to campaigns with custom field mapping.
Drip
Push subscribers into Drip with event and tag support.
Klaviyo
Sync profiles for ecommerce-focused email + SMS flows.
Setup
Get an API key
Pull the API key (or OAuth credentials for Constant Contact) from your provider's dashboard.
Configure globally
Go to FormForge → Integrations, enable the provider, and paste the credentials.
Enable on a form
Edit the form → Integrations tab → enable the provider. Pick the target list/audience/group, then map your form fields (Email is always required).
AWeber and ConvertKit ship as additional drop-in integrations under integrations/email/ alongside the eight listed above.
CRM Integrations BUSINESS
Connect your forms to popular CRM platforms: HubSpot, Salesforce, Zoho CRM, and Pipedrive.
Supported CRMs
HubSpot
Automatically create or update contacts. Supports custom properties.
Salesforce
Create Leads or Contacts with full field mapping.
Zoho CRM
Create Leads or Contacts in your Zoho account.
Pipedrive
Create Persons, Organizations, Deals, and Notes.
Setup Process
Get API credentials
Create an app or get API token from your CRM provider.
Configure global settings
Go to FormForge → Integrations, enable your CRM, and enter credentials.
Enable per form
Edit your form, go to Integrations tab, enable the CRM for this form.
Map fields
Map form fields to CRM contact properties (email is usually required).
Existing contacts are updated with new data - no duplicates are created. Contacts are matched by email address.
Automation (Zapier/Make) BUSINESS
Connect your forms to Make (formerly Integromat), Zapier, and custom webhooks for powerful automation workflows.
Make Integration
Create a Make Scenario
In Make, create a new Scenario with a Webhooks → Custom webhook module as the first step. Copy the webhook URL.
Configure FormForge
Go to FormForge → Integrations → Make and enable it. Then edit your form, go to Integrations, enable Make, and paste your webhook URL.
Define Data Structure
In Make, click "Determine data structure" then submit a test entry. Make captures the JSON structure for mapping.
Zapier Integration
Connect to 5,000+ apps through Zapier. Enable Zapier in FormForge → Integrations, copy your webhook URL, and create a new Zap with "Webhooks by Zapier" trigger.
Custom Webhooks
Send form data to any URL endpoint. In your form's Integrations tab, enter your webhook URL and choose the method (POST or GET).
Common Automation Workflows
- Add to Google Sheets: Webhook → Google Sheets (Add Row)
- Create CRM Contact: Webhook → HubSpot/Salesforce/etc.
- Send Slack Notification: Webhook → Slack (Send Message)
- Multi-step: Webhook → Router → Multiple branches
Slack Integration AGENCY
Get instant Slack notifications when forms are submitted.
Setting Up Slack
Create Slack App
Go to Slack API, create a new app "From scratch", name it "FormForge Pro", and select your workspace.
Enable Incoming Webhooks
In your app settings, go to Incoming Webhooks, toggle it ON, click Add New Webhook to Workspace, select a channel, and copy the webhook URL.
Configure in FormForge
Go to FormForge → Integrations → Slack, enable it, paste your webhook URL, configure bot name/icon, and test the webhook.
Message Format
Slack notifications include:
- Header: "New Submission: [Form Name]"
- Body: All submitted fields and values
- Footer: Link to view entry in admin, entry ID and timestamp
Per-Form Settings
Edit your form, go to Integrations → Slack, toggle Send to Slack ON. You can optionally specify a different channel per form.
White Label AGENCY
Rebrand FormForge Pro for your clients without any trace of Royal Plugins branding.
What Gets Rebranded
| Element | Customizable | Location |
|---|---|---|
| Plugin name | Yes | Plugins list, menus |
| Plugin description | Yes | Plugins list |
| Author name & URI | Yes | Plugins list |
| Menu icon | Yes | WordPress admin menu |
| Admin footer | Yes | Plugin admin pages |
| Support links | Hide | License/support pages |
Enabling White Label
- Go to FormForge → Settings
- Scroll to White Label section
- Toggle Enable White Label ON
- Configure: Plugin Name, Description, Author Name, Author URI, Menu Icon, Admin Footer
- Optionally hide support links and update notices
- Save settings
Menu Icon Options
Use built-in dashicons (dashicons-feedback, dashicons-forms, dashicons-clipboard, dashicons-email, etc.) or a custom image URL.
Use consistent branding with your company colors/name. If hiding updates, ensure you manage plugin updates on behalf of clients. Create your own support documentation for white-labeled installations.
Frontend Entry Editing AGENCY
Allow users to edit their own form submissions from the frontend of your site.
Enabling Entry Editing
- Edit your form in the builder
- Go to Settings → Entries
- Toggle Allow Entry Editing ON
- Save the form
How Users Access Edit Mode
| Method | URL Format |
|---|---|
| URL Parameter | yoursite.com/contact/?rfp_edit=123 |
| Edit Token (guests) | yoursite.com/contact/?rfp_edit=123&rfp_edit_token=abc123 |
| Shortcode | [royal_form_edit entry_id="123"] |
Edit Permissions
- Admins: Can always edit (requires
manage_optionscapability) - Logged-in users: Can edit their own entries (user ID must match)
- Guests: Can edit with valid edit token
Edit Form Behavior
All previously submitted values load automatically. Users can modify any field, but required fields remain required. File uploads cannot be changed (existing files are preserved). Payment fields are not editable.
Creating Edit Links for Users
In email notifications or confirmation messages, use the merge tag {entry_edit_url} to generate a tokenized link users can click to edit their submission.
Permissions are always verified server-side. Updated entries are logged with timestamps for audit trails. Sensitive fields can be locked from editing.
Template Library
FormForge Pro includes 110 pre-built form templates across 16 categories, so you can launch professional forms in seconds instead of building from scratch.
Template Tiers
- Pro Templates (40): Contact forms, feedback, registration, newsletter signup, support tickets, and more everyday forms.
- Business Templates (40): Invoice generators, employee onboarding, NDA agreements, project proposals, event registration, and advanced business workflows.
- Agency Templates (30): Client intake, brand questionnaires, website briefs, social media audits, and specialized agency workflows.
Categories
Templates are organized into 16 categories: Contact, Feedback, Registration, Application, Survey, Quiz, Order, Booking, Payment, HR, Legal, Healthcare, Education, Real Estate, Marketing, and Nonprofit.
View and preview all 110 templates on the FormForge Templates Gallery. Each template shows a live preview of the form fields, tier requirement, and a direct link to start using it.
Using Templates
Templates give you a head start - every field, label, and setting is pre-configured so you can customize rather than build from scratch.
Applying a Template
Create a new form
Go to FormForge → Add New in your WordPress admin.
Browse templates
The template picker shows all available templates for your license tier. Use the category tabs or search bar to find what you need.
Preview and select
Click any template to preview its fields and layout. Click "Use This Template" to apply it.
Customize
The template loads into the drag-and-drop builder. Add, remove, or rearrange fields. Update labels, placeholder text, and validation rules to match your needs.
Templates are tied to your license tier. Pro licenses get 40 templates, Business licenses get 80 (Pro + Business), and Agency licenses get all 110 templates. Compare plans to see which tier fits your needs.
Troubleshooting
Form not submitting
Check browser console for JavaScript errors. Verify AJAX is not blocked. Try disabling other plugins to find conflicts.
Emails not sending
Install an SMTP plugin (WP Mail SMTP). Check spam folder. Verify email addresses are correct.
Entries not saving
Check database table exists. Verify user has permissions. Look for PHP errors in debug.log.
Conditional logic not working
Verify field IDs match. Check rule logic (all vs any). Ensure fields have valid values.
File upload failed
Check PHP upload limits. Verify folder permissions. Ensure file type is allowed.
Payment not processing
Verify API keys are correct (test vs live). Check Stripe/PayPal dashboard for errors. Enable webhook for confirmations.
Email support@royalplugins.com with your site URL, FormForge version, and a description of the issue. Priority email support is included with your FormForge Pro license — typical response time is within 24 hours.
Frequently Asked Questions
Can I use FormForge with any theme?
Yes, FormForge works with any properly coded WordPress theme. Forms automatically inherit your theme's styles, and you can customize further with the built-in style options or custom CSS.
How many forms can I create?
Unlimited forms on any license tier. There's no limit to the number of forms, fields, or entries.
Does it work with page builders?
Yes! FormForge includes native blocks for Gutenberg, widgets for Elementor, and shortcodes that work anywhere. It's compatible with Beaver Builder, Divi, and other page builders.
Can I export form entries?
Yes, export to CSV or Excel from the Entries screen. You can filter by date range, payment status, or specific fields before exporting.
Is it GDPR compliant?
FormForge includes features to help with GDPR compliance: consent checkboxes, entry deletion on request, and data stored only on your server (not our servers).
Can I use the same license on staging and production?
Yes, staging sites (containing "staging", "dev", or "local" in the URL) don't count against your site limit.