# Setting Up S3-Compatible Cloud Storage
> Connect Amazon S3, DigitalOcean Spaces, Cloudflare R2, Backblaze B2, Wasabi or MinIO as SiteVault Pro backup destinations, with bucket and credential steps.
- Canonical:
- Last updated: 2026-09-17
- HTML version:
---
This page teaches you how to connect S3-compatible cloud storage to SiteVault Pro. You can use Amazon S3, DigitalOcean Spaces, Cloudflare R2, Backblaze B2, Wasabi, or a self-hosted MinIO server as your backup destination. Each provider needs the same five pieces of information: a bucket, an endpoint, a region, an access key, and a secret. The exact values differ per provider, and this guide walks through each one.
You’ll need before you start
An account with the cloud provider you want to use, and the ability to create a bucket in that provider’s console. SiteVault does not create the bucket for you, make it in the provider’s UI first, then paste the bucket name into the SiteVault modal.
## Which SiteVault modal to use
SiteVault Pro has two entry points for S3-flavored cloud storage on the **SiteVault > Cloud Storage** page, under the **Bring Your Own Credentials** group:
#### Amazon S3
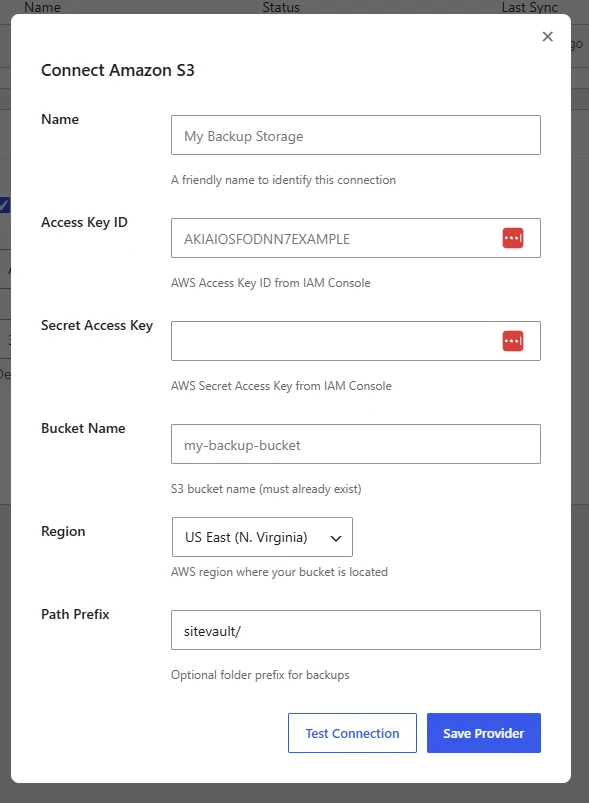
Use when your bucket lives in an actual AWS account. Region is a dropdown of standard AWS regions. Endpoint is filled in automatically from the region.
#### S3-Compatible
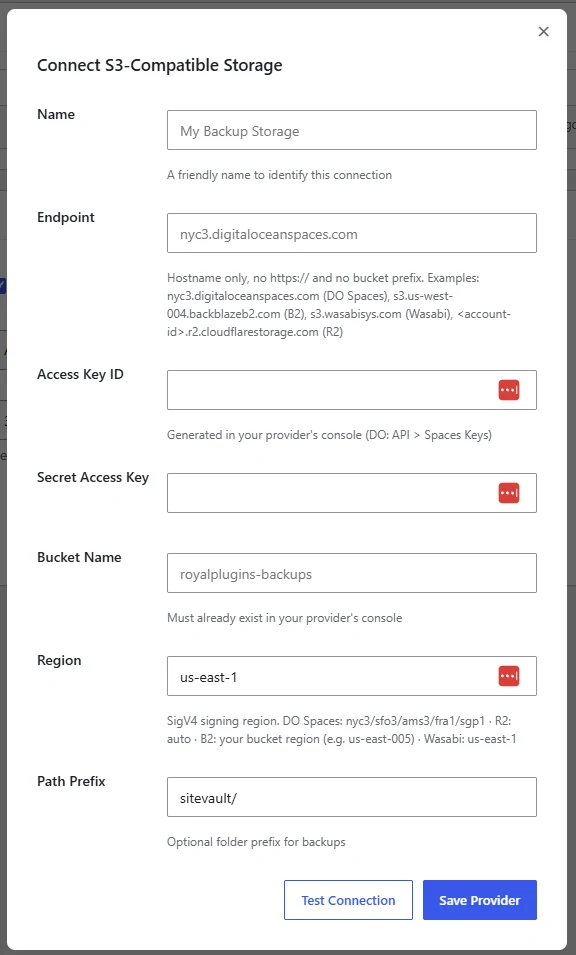
Use for DigitalOcean Spaces, Cloudflare R2, Backblaze B2, Wasabi, or MinIO. Adds an Endpoint field so you can point SiteVault at any provider that speaks the S3 API.
Click **Connect** on either card to open the setup modal. Both modals expose a **Test Connection** button next to **Save Provider**, so you can verify credentials before saving.
## Amazon S3
### Create the bucket + IAM key in AWS
#### Create an S3 bucket
In the AWS console, open **S3 > Create bucket**. Pick a globally unique bucket name (for example `mysite-sitevault-backups`), choose an AWS region close to your site, and leave the default settings (block all public access = on). Click Create.
#### Create a dedicated IAM user
In the AWS console open **IAM > Users > Add user**. Give it a name like `sitevault-backups` and select **Programmatic access**. Skip the Console access option.
#### Attach a bucket-scoped policy
Attach an inline policy allowing `s3:ListBucket`, `s3:GetObject`, `s3:PutObject`, and `s3:DeleteObject` against just the bucket you created. Scoping to the bucket keeps the key from touching anything else in your AWS account if it’s ever compromised.
#### Save the Access Key ID + Secret
AWS shows the Access Key ID and Secret Access Key exactly once. Copy both into a secure place. If you lose the Secret you’ll need to generate a new one.
### Fill in the SiteVault Amazon S3 modal
- **Name.** Friendly label, shown in the Connected Providers table. Example: `My Backup Storage`.
- **Access Key ID.** From the IAM user you just created.
- **Secret Access Key.** From the IAM user.
- **Bucket Name.** The exact bucket name you created (must already exist).
- **Region.** The AWS region you picked when creating the bucket. Choose from the dropdown.
- **Path Prefix.** Optional folder inside the bucket where backups are stored. Default: `sitevault/`. Change it if you use one bucket for multiple sites and want to keep them separated.
Click **Test Connection**. On success, click **Save Provider**. The new provider appears in the Connected Providers table below.
## DigitalOcean Spaces
### Create the Space + Spaces Key in DigitalOcean
#### Create a Space
In the DigitalOcean control panel, open **Spaces Object Storage > Create Space**. Pick a datacenter region (NYC3, SFO3, AMS3, FRA1, or SGP1), enable CDN if you want, and give the Space a unique name.
#### Generate a Spaces access key
Go to **API > Spaces Keys** in the DO control panel. Click **Generate New Key** and name it (for example `sitevault-backups`). DO shows the Key (access key ID) and Secret exactly once. Copy both.
### Fill in the SiteVault S3-Compatible modal
Under Bring Your Own Credentials, click **Connect** on the S3-Compatible card.
- **Name.** Friendly label. Example: `DO Spaces Backups`.
- **Endpoint.** The datacenter hostname without `https://`. Examples: `nyc3.digitaloceanspaces.com`, `sfo3.digitaloceanspaces.com`, `ams3.digitaloceanspaces.com`, `fra1.digitaloceanspaces.com`, `sgp1.digitaloceanspaces.com`. Do not include the bucket name.
- **Access Key ID.** The Key from DigitalOcean’s Spaces Keys page.
- **Secret Access Key.** The Secret from the same page.
- **Bucket Name.** The Space name you created.
- **Region.** The datacenter code (`nyc3`, `sfo3`, `ams3`, `fra1`, or `sgp1`), match the datacenter your Space is in.
- **Path Prefix.** Optional. Default `sitevault/`.
Click **Test Connection**, then **Save Provider**.
## Cloudflare R2
Cloudflare R2 has no egress fees on downloads to Cloudflare’s network and cheap egress everywhere else, a good fit for offsite backups you rarely restore from but want to keep long-term.
### Create the R2 bucket + API token in Cloudflare
#### Enable R2 and create a bucket
In the Cloudflare dashboard, open **R2 Object Storage > Create bucket**. Pick a bucket name and a location (either Automatic or a specific region hint).
#### Note your Account ID
Cloudflare’s R2 endpoint includes your account ID in the hostname. Find it under R2 > Overview > Account details. It looks like a 32-character hex string.
#### Create an R2 API token
Under **R2 > Manage R2 API Tokens > Create API Token**. Give it a name, choose **Object Read & Write** permission, and scope it to just the bucket you created. Cloudflare shows the Access Key ID and Secret Access Key exactly once. Copy both.
### Fill in the SiteVault S3-Compatible modal
- **Name.** Friendly label. Example: `Cloudflare R2 Backups`.
- **Endpoint**, `.r2.cloudflarestorage.com`. Replace `` with the hex account ID from Cloudflare. No `https://`, no bucket name.
- **Access Key ID.** From the R2 API token you created.
- **Secret Access Key.** From the same token.
- **Bucket Name.** The R2 bucket name.
- **Region**, `auto`. Cloudflare R2 uses a virtual region called `auto`; do not use an AWS-style region code here.
- **Path Prefix.** Optional. Default `sitevault/`.
Click **Test Connection**, then **Save Provider**.
## Backblaze B2
B2 is typically the lowest per-gigabyte storage cost of the S3-compatible providers, which makes it attractive if you have a lot of backup history to retain.
### Create the bucket + Application Key in Backblaze
#### Create a B2 bucket
In the Backblaze console, open **B2 Cloud Storage > Buckets > Create a Bucket**. Give it a unique name and choose Private for the visibility. Save.
#### Note the S3 endpoint for your bucket
On the bucket detail page, B2 shows the S3-compatible endpoint. It looks like `s3.us-west-004.backblazeb2.com` where the number matches your account’s cluster. Different accounts land on different numbers; use whatever B2 shows for your bucket.
#### Create an Application Key scoped to the bucket
Open **App Keys > Add a New Application Key**. Name it, restrict access to your specific bucket, choose **Read and Write** capabilities, and create the key. B2 shows the `keyID` and `applicationKey` exactly once. Copy both.
### Fill in the SiteVault S3-Compatible modal
- **Name.** Friendly label. Example: `Backblaze B2 Backups`.
- **Endpoint.** Whatever B2 showed for your bucket, without `https://`. Example: `s3.us-west-004.backblazeb2.com`.
- **Access Key ID.** The B2 `keyID`.
- **Secret Access Key.** The B2 `applicationKey`.
- **Bucket Name.** The B2 bucket name.
- **Region.** Your bucket region such as `us-east-005`. Match the region embedded in your endpoint (the `004`, `005`, etc. from the hostname).
- **Path Prefix.** Optional. Default `sitevault/`.
Click **Test Connection**, then **Save Provider**.
## Wasabi
Wasabi advertises no egress fees and a flat storage price, which can be a good fit if your backup restore volume is unpredictable.
### Create the bucket + access key in Wasabi
#### Create a Wasabi bucket
In the Wasabi console, open **Buckets > Create Bucket**. Pick a region (us-east-1, us-east-2, us-west-1, eu-central-1, and others) and give the bucket a unique name.
#### Create an access key
Under **Access Keys > Create New Access Key**. Choose Root User or, better, a dedicated user with a policy scoped to the bucket you created. Wasabi shows the Access Key and Secret Key exactly once. Copy both.
### Fill in the SiteVault S3-Compatible modal
- **Name.** Friendly label. Example: `Wasabi Backups`.
- **Endpoint**, `s3.wasabisys.com` for us-east-1. Other regions use their own endpoint (for example `s3.eu-central-1.wasabisys.com`). Check the Wasabi documentation for your exact region’s endpoint. No `https://`.
- **Access Key ID.** The Wasabi Access Key.
- **Secret Access Key.** The Wasabi Secret Key.
- **Bucket Name.** The Wasabi bucket name.
- **Region.** The bucket’s region code (`us-east-1` for the wasabisys.com endpoint; match the endpoint you entered for other regions).
- **Path Prefix.** Optional. Default `sitevault/`.
Click **Test Connection**, then **Save Provider**.
## MinIO (self-hosted)
MinIO is an open-source S3-compatible object store you host yourself. It’s a good fit for on-premises setups or air-gapped environments where you want backups to stay inside your own infrastructure.
### Prepare your MinIO instance
#### Confirm MinIO is reachable from your WordPress server
The MinIO server needs to be reachable over HTTPS from the machine your WordPress site runs on. If MinIO is behind a firewall or on a private network, make sure the WordPress server can reach it.
#### Create a bucket
In the MinIO console, create a bucket with a name of your choice.
#### Create a service account
Create a new access key under **Identity > Service Accounts** (or, on older MinIO versions, under **Access Keys**). Restrict its policy to the target bucket where possible. Save the Access Key and Secret Key.
### Fill in the SiteVault S3-Compatible modal
- **Name.** Friendly label. Example: `Internal MinIO Backups`.
- **Endpoint.** The hostname of your MinIO server, no `https://`, no bucket path. Example: `minio.internal.example.com`.
- **Access Key ID.** The MinIO access key.
- **Secret Access Key.** The MinIO secret key.
- **Bucket Name.** The bucket you created in MinIO.
- **Region.** Usually `us-east-1`, unless you have set `MINIO_REGION` to something else on the server. Match what your MinIO config uses.
- **Path Prefix.** Optional. Default `sitevault/`.
Click **Test Connection**, then **Save Provider**.
MinIO with a self-signed certificate
SiteVault expects a valid HTTPS certificate. If your MinIO instance uses a self-signed certificate, install a real certificate (LetsEncrypt or a private CA rooted on your WordPress server) before pointing SiteVault at it. Skipping certificate verification is not recommended for a system storing your backups.
## Verifying the connection and syncing existing backups
Once the provider is saved, three actions live on the row inside the Connected Providers table:
- **Test.** Runs the same connectivity probe as the modal’s Test Connection button. Use this if credentials rotated or the bucket was moved.
- **Sync Now.** Uploads any completed backups on the site that have not yet been synced to this provider. Useful right after adding a new provider, or after fixing a credential problem.
- **Delete.** Removes the provider from SiteVault. Does not delete anything from the bucket itself.
After clicking **Sync Now**, watch the **Last Sync** column in the Connected Providers table. It updates when the upload completes. If sync fails 3 times in a row, SiteVault fires the alert notice described in [Understanding Cloud Sync Failure Alerts](https://royalplugins.com/support/sitevault/cloud-sync-failure-alerts/).
## Common Test Connection failures
| Error you see | Most common cause | Fix |
| --- | --- | --- |
| `InvalidAccessKeyId` or `Access Denied` | Typo in the Access Key ID or Secret, or the key was rotated on the provider side | Copy and paste the credentials fresh from the provider console. Watch out for stray whitespace at the start or end. |
| `NoSuchBucket` or `The specified bucket does not exist` | The bucket name in the modal doesn’t match a real bucket, or the endpoint points at a different region than the bucket | Confirm the bucket exists in the provider console and that the Endpoint hostname matches the region the bucket is in. |
| `Could not resolve host` or DNS errors | Endpoint hostname is misspelled or contains `https://` or a bucket prefix | Enter the hostname only, no scheme, no bucket name. See the endpoint examples per provider above. |
| `SignatureDoesNotMatch` | Region value doesn’t match what the provider expects for SigV4 signing | Cloudflare R2 needs `auto`. Wasabi wasabisys.com needs `us-east-1`. B2 needs your bucket region such as `us-east-005`. DO Spaces needs the datacenter code. |
| `PermanentRedirect` (or a redirect chain) | Endpoint points at a different region than the bucket lives in | Move the bucket to the region matching the endpoint, or change the endpoint to match the bucket’s actual region. |
| Timeout with no specific error code | Firewall between your WordPress server and the provider, or the provider is blocking your server’s IP | Check outbound HTTPS is allowed from your WordPress host. For self-hosted MinIO on a private network, confirm the WordPress server can reach the MinIO hostname. |
## FAQ
### What is the difference between the Amazon S3 and S3-Compatible options in SiteVault?
The Amazon S3 modal is preset for AWS and shows a Region dropdown of the standard AWS regions. Use it when your bucket lives in an actual AWS account. The S3-Compatible modal adds an **Endpoint** field so you can point SiteVault at any provider that speaks the S3 API, DigitalOcean Spaces, Cloudflare R2, Backblaze B2, Wasabi, or a self-hosted MinIO instance.
### Do I need to create the bucket in the provider console first?
Yes. SiteVault does not create the bucket for you. Create it in the provider’s console first, then paste the bucket name into the SiteVault modal. The helper text under the **Bucket Name** field says “must already exist” as a reminder.
### What permissions does the access key need?
The access key must be able to list, put, get, and delete objects in the target bucket. SiteVault uses list and put during backup uploads, get during cloud downloads and restores, and delete when the retention policy cleans up old backups. If the key lacks delete permission, retention deletions will surface as failed syncs via the alert framework described in [Understanding Cloud Sync Failure Alerts](https://royalplugins.com/support/sitevault/cloud-sync-failure-alerts/).
### Can I use one bucket for backups from multiple sites?
Yes, if you set a unique **Path Prefix** per site. For example, use `site-one/` on one site and `site-two/` on the other. Backups from each site end up under its own prefix inside the same bucket. Do not share the same prefix between two sites, retention would delete each other’s backups.
### Are the credentials encrypted at rest in the WordPress database?
Yes. SiteVault encrypts every stored credential using authenticated AES-256-GCM. The encryption key is derived from a per-site secret combined with your WordPress `AUTH_KEY` constant, so the ciphertext in the database is unreadable without both. Credentials are only decrypted at the moment SiteVault needs to call the cloud API.
### What is the Path Prefix field for?
Path Prefix is an optional folder name prepended to every backup uploaded to the bucket. The default is `sitevault/`. Setting a prefix keeps backups organized inside a bucket that might contain other data, and lets a single bucket host backups from multiple sites (see previous question).
[Quick Start, Your First Backup](https://royalplugins.com/support/sitevault/quick-start/)
[Understanding Cloud Sync Failure Alerts](https://royalplugins.com/support/sitevault/cloud-sync-failure-alerts/)