# Connecting Royal MCP to Claude
> Connect Royal MCP to Claude three ways: claude.ai web, Claude Desktop and Claude Code CLI, with OAuth or an API key when OAuth is blocked by your host.
- Canonical:
- HTML version:
---
Three ways to connect: **claude.ai in your browser**, **Claude Desktop**, and **Claude Code in your terminal**. Browser and Desktop now use the identical connector flow — same UI, same steps, one video covers both. Each surface supports **OAuth** (the recommended default) and an **API key fallback** for sites where OAuth is blocked by Cloudflare, a managed-host WAF, or a security plugin. Pick your surface and follow the matching section.
## First — Install and Enable Royal MCP
Before connecting anything to Claude, Royal MCP needs to be running on your WordPress site. Three small steps:
#### Install the plugin
In wp-admin, go to **Plugins → Add New**, search for **Royal MCP**, and click **Install Now**. Or download the latest version from [wordpress.org/plugins/royal-mcp/](https://wordpress.org/plugins/royal-mcp/) and upload the zip.
#### Activate
On the Plugins page, click **Activate** under Royal MCP. A new **Royal MCP** item appears in your wp-admin sidebar.
#### Enable the integration + flush Permalinks
Go to **Royal MCP → Settings → General Settings** and turn on the **Enable Royal MCP Integration** toggle (it’s off by default after activation). Then go to **Settings → Permalinks** and click **Save Changes** once — this flushes WordPress’s rewrite rules so the OAuth endpoints resolve. Don’t skip this; the connectors below won’t work until rewrites are flushed and Permalinks must not be set to “Plain.”
Quick sanity check before moving on
Open `https://example.com/.well-known/oauth-authorization-server` in any browser. If you see a JSON response listing `issuer`, `authorization_endpoint`, and `scopes_supported`, Royal MCP is live and the connectors below will work. If you see a 404 or an HTML page, jump to the [troubleshooting checklist](https://royalplugins.com/support/royal-mcp/troubleshooting-start-here/) — something is intercepting your request before it reaches WordPress.
## Choose Your Surface
Pick where you’ll be using Claude. The setup steps differ by surface, but the underlying connection is the same Royal MCP server in all three cases.
| Surface | Best for | Visual / text | Jump to |
| --- | --- | --- | --- |
| **claude.ai (browser)** | The most common path. Open Claude in any browser, click Connect. | Visual | [Browser + Desktop section ↓](#browser-and-desktop) |
| **Claude Desktop** | The native macOS / Windows app. Identical setup to the browser. | Visual | [Browser + Desktop section ↓](#browser-and-desktop) |
| **Claude Code (CLI)** | Terminal-native workflows, VS Code, JetBrains integrations. | Text | [Terminal section ↓](#terminal) |
You can connect more than one
Many users run Royal MCP in both claude.ai web AND Claude Code at the same time — same site, two surfaces. There’s no conflict, no extra license, no per-device limit. Pick whichever you start with, add the others later.
## claude.ai (Browser) and Claude Desktop — Identical Setup
Anthropic has unified the connector flow across claude.ai in the browser and the Claude Desktop app. The UI is identical, the steps are identical, and the OAuth handshake is identical. Whichever you use, follow the same instructions below.
Installing Claude Desktop on Windows? Use claude.ai/download, NOT the Microsoft Store
Download Claude Desktop from [**claude.ai/download**](https://claude.ai/download). The Microsoft Store version is sandboxed and reads its config from a non-standard path under `%LOCALAPPDATA%\Packages\Claude_pzs8sxrjxfjjc\LocalCache\` instead of the standard `%APPDATA%\Claude\` that every Anthropic doc and our own walkthroughs reference — any config-file edits you make at the documented path will be silently ignored. If you already installed from the Store, uninstall it first, then install from claude.ai/download. (macOS users: no equivalent issue — install from claude.ai/download as you would any other app.)
The first time you connect, you’ll see the OAuth consent screen. Every time after that — on the same Claude account — Claude reconnects silently in the background, no consent prompt, no extra clicks. The two videos below cover both cases.
### First-time setup — the new Claude wizard
Anthropic redesigned the *Add custom connector* wizard mid-August 2026. The flow now has up to four screens depending on how fast your WordPress site responds to OAuth discovery — the wizard imposes a five-second budget, which most WordPress sites will exceed at least occasionally. Both paths through the wizard work, and the wizard gets smarter after your first successful connection: subsequent setups on the same account tend to skip the fallback screen and auto-detect the right settings.
[
Your browser doesn’t support embedded video. The same steps are written out below.
](/royal-mcp/videos/claude-wizard-auto-detect.mp4)
Claude’s current wizard, end to end — five-second check times out, fallback options screen appears with the correct OAuth client already auto-detected (labeled “Detected”), you click Add then Connect, then Authorize on the WordPress prompt.
Expect the first setup to take two tries — then it gets easier
The five-second OAuth-discovery budget in the wizard is aggressive for shared hosting, Cloudflare-fronted sites, and any host that redirects `/.well-known/*`. Timing out on the initial check is **normal, not broken** — the wizard shows a full options screen you complete manually.
Good news: **the wizard learns.** On subsequent reconnects, and often on second-time setup against the same site, Claude’s wizard auto-detects your server capabilities and pre-picks the right settings for you (labeled “Detected”). See the silent-reconnect section below for what day-to-day usage looks like.
#### Open Settings → Connectors → Add custom connector
In claude.ai (browser): click your profile in the bottom-left → **Settings** → **Connectors** → **Add custom connector**. In Claude Desktop: **Settings** (gear icon) → **Connectors** → **Add custom connector**. You can also click the **+** button inside any chat window → **Add connectors** → **Add custom connector**.
#### Name it, then paste your MCP endpoint
Give it any name (e.g. `My Site MCP`). Paste your WordPress site’s MCP endpoint into the URL field:
```
https://example.com/wp-json/royal-mcp/v1/mcp
```
The wizard fires a three-step check: *Connecting to the server* → *Looking up sign-in settings* → *Checking the sign-in provider*. Two things can happen next — whichever one you see is normal.
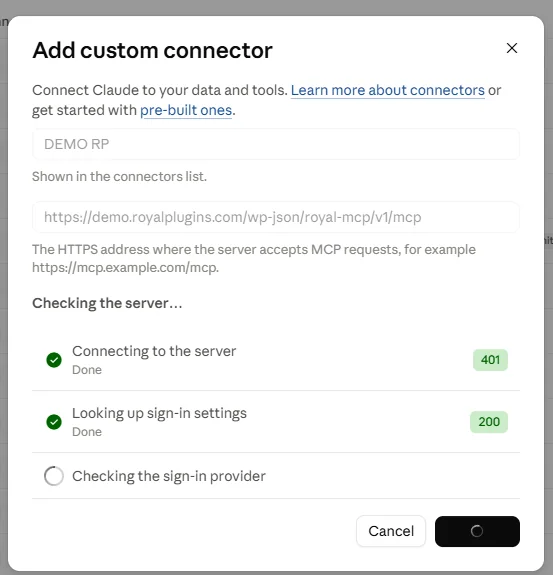
Screen 1 — the wizard runs a three-step check with a five-second budget.
#### Path A — the check completes in under five seconds
The wizard closes and Claude opens a new tab or dialog with the OAuth authorization prompt from your WordPress site. **Skip to step 6 below.**
#### Path B — the check exceeds five seconds (very common; this is normal)
The wizard drops you onto a full options screen with a yellow banner reading *“Some checks were skipped because the server took longer than 5 seconds. The settings below may need adjusting.”* This is not an error — it’s a fallback flow.
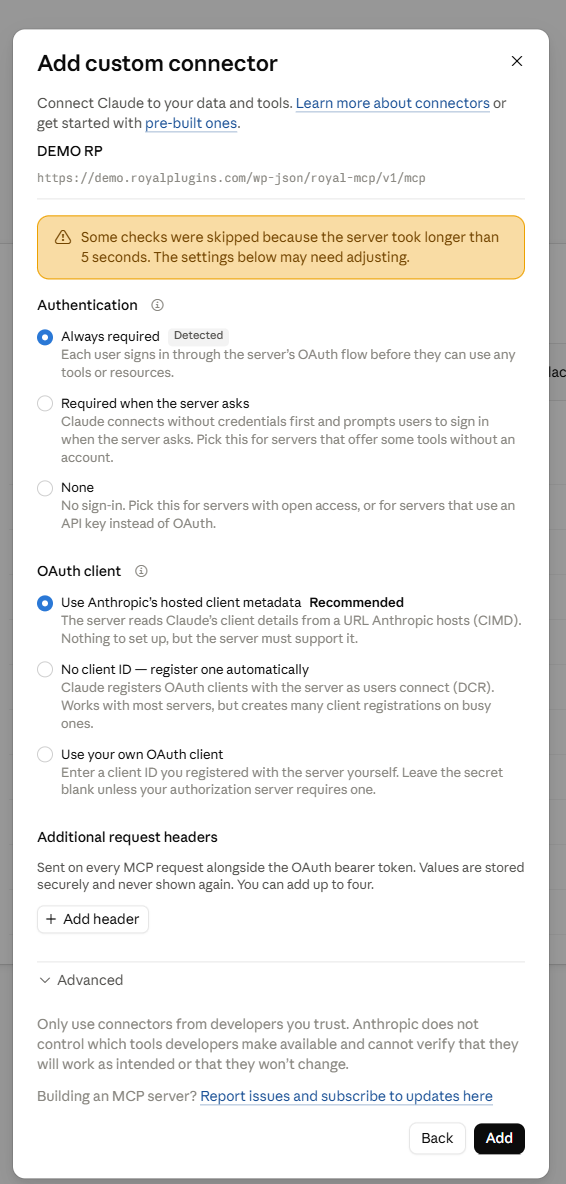
Screen 2 — the wizard’s fallback options screen. Configure the radios as described below.
**What it looks like when the check succeeds under the 5-second budget** (no yellow warning banner, and the wizard has already pre-picked both radios with green “Detected” labels): just click **Add**.
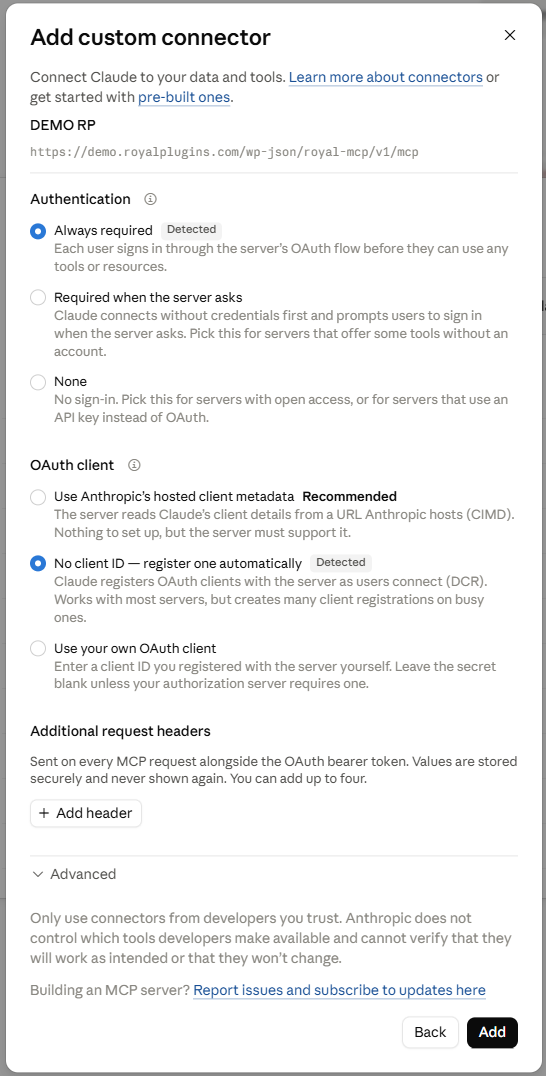
Screen 2 (auto-detected variant) — when Claude’s check completes cleanly, both radios come pre-set with green Detected badges and there’s no yellow banner. Same “click Add” outcome, no manual configuration needed.
Configure the options like this for Royal MCP (only relevant if you got the fallback screen above, not the auto-detected variant):
- **Authentication:** Leave *Always required* selected (usually pre-checked as “Detected”). Every session prompts for OAuth sign-in before Royal MCP tools can run — the correct behavior for a WordPress site.
- **OAuth client:** Usually pre-selected as *“No client ID — register one automatically”* with a **Detected** label — if so, leave it. If you see the third option (*“Use Anthropic’s hosted client metadata (Recommended)”*) auto-selected instead, either works: DCR is what Royal MCP fully supports today, and Claude silently falls back to DCR anyway if you leave the hosted-metadata option selected. If nothing is auto-detected, choose *No client ID — register one automatically* manually. (Both scenarios are shown in the videos on this page.)
- **Additional request headers:** Leave empty. Only used if you want to authenticate with a fixed API key instead of OAuth — see the API-key fallback section below for when that path applies.
- **Advanced:** Leave collapsed. Not needed for standard Royal MCP setup.
#### Click Add, then Connect (Path B only)
After Path B, clicking Add does **not** complete the connection. Claude briefly shows a *“Checking connection...”* screen while it finalizes the connector, then drops you on the connector detail page.
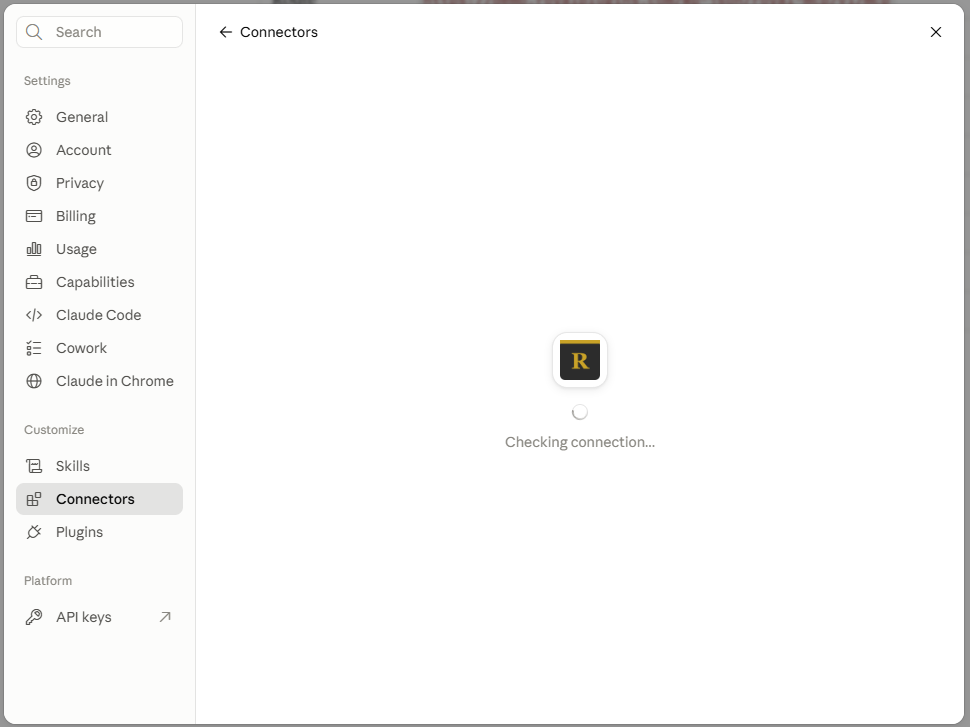
Between Add and Connect — Claude spins briefly while it finalizes the connector.
Then the connector detail page appears with *“You started connecting to [connector name] but didn’t finish”* and a **Connect** button. Click **Connect** — a new tab or dialog opens with the OAuth authorization prompt from your WordPress site.
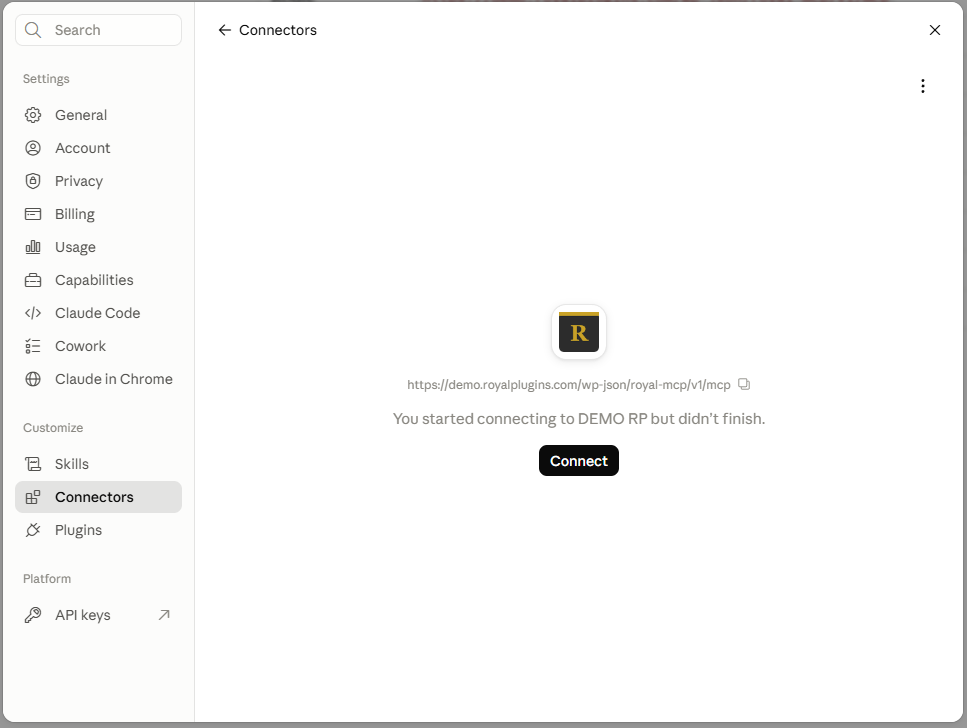
Screen 3 — connector detail page after Add. Click Connect to trigger the OAuth authorization prompt.
*If the OAuth prompt doesn’t appear after Connect, click Connect again. The wizard sometimes needs a second attempt.*
#### Authorize on the WordPress-hosted OAuth prompt
You’ll see *“Claude wants to connect to your WordPress site”* with the scopes listed. Click **Authorize**. The tab closes and Claude flips the connector to Connected.
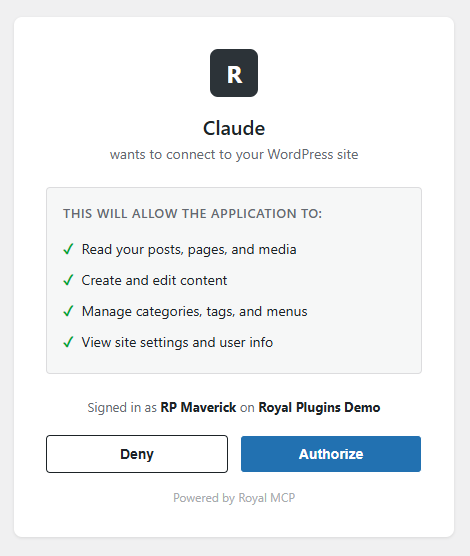
Screen 4 — the WordPress-hosted OAuth authorization prompt. Click Authorize.
#### Confirm the connector is live and see your tool count
Once you authorize, Claude flips the connector to connected and lands you on the connector detail page. You’ll see your MCP URL, a **Disconnect** button, and a **Tool permissions** section listing every tool Royal MCP exposes on your site. The count on the **Other tools** group is your live tool inventory — it grows automatically as you add integrations (WooCommerce, ACF, Elementor, Divi, and so on). Use the per-row Allow / Ask / Deny controls to scope what Claude can do without asking each time.
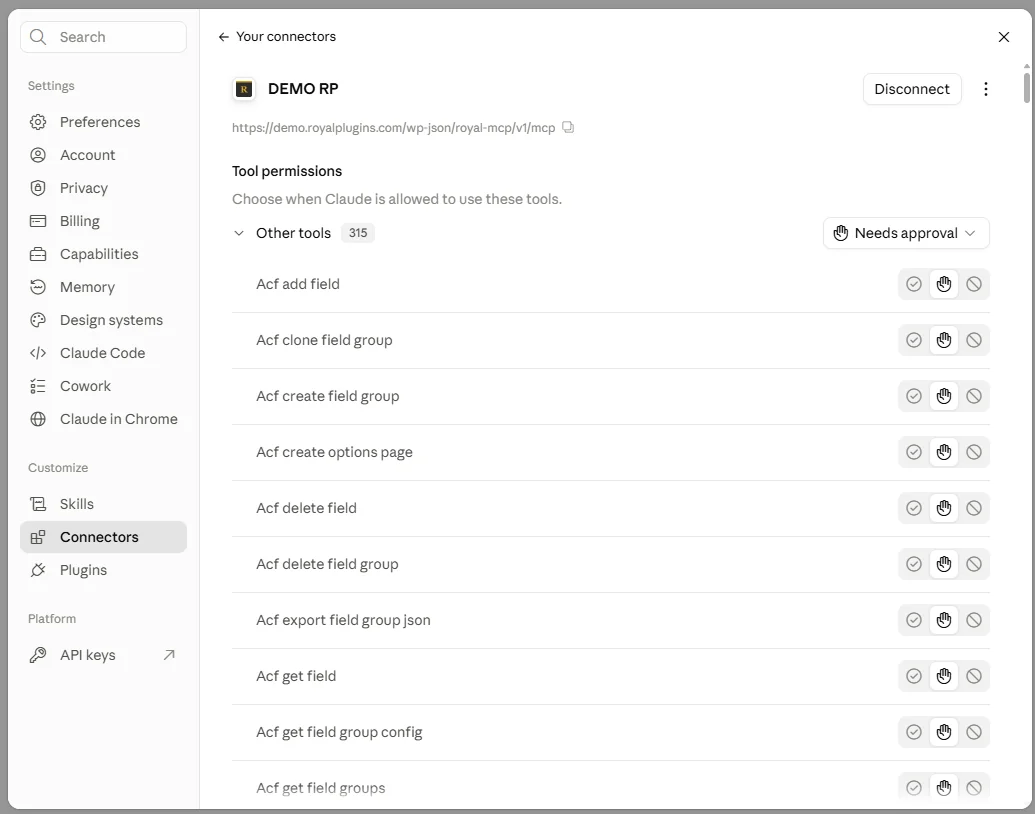
Screen 5 — the connected view. Every Royal MCP tool appears here with a per-tool Allow / Ask / Deny control.
#### Verify in a new chat
Open a new conversation. Click the **+** button next to the input box → **Connectors** and confirm your Royal MCP connector toggle is on. Then ask Claude: *“Do we have an open connector to example.com?”* (replace with your actual site). Claude will call `wp_get_site_info` against that specific connector and reply with the site’s URL and name. Anchoring on your specific domain is better than a generic “list my recent posts” — if you have multiple sites connected, the generic question will list every connector or pick one ambiguously.
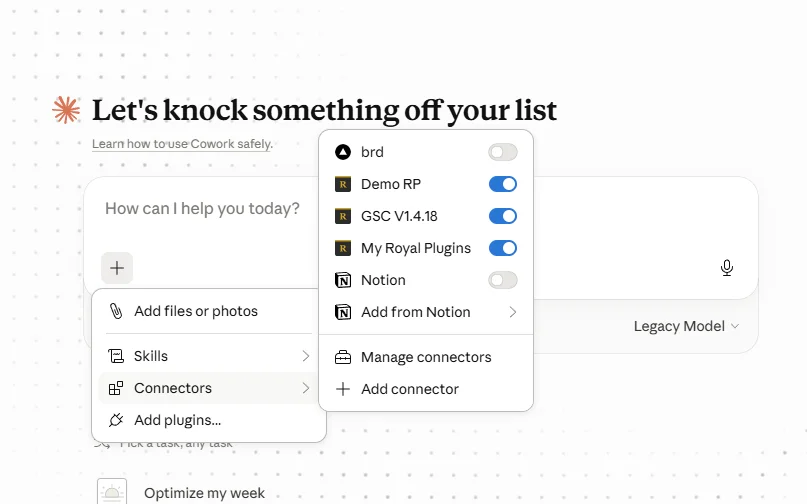
Claude → + button → Connectors. Toggle Royal MCP on per-conversation. Same flow in claude.ai web and Claude Desktop.
Tip: keep WP Admin open while you connect
Open Royal MCP → Activity Log in a separate browser tab before you click Connect. You’ll see live entries fire as the OAuth dance progresses (`oauth:register` → `oauth:authorize` → `oauth:token`). If something goes wrong, the Activity Log shows you which step failed and the exact reason — that’s the single most useful diagnostic Royal MCP gives you.
#### Alternate path — forcing the “hosted client metadata” option
If Claude’s wizard didn’t auto-detect your server and you want to try the third OAuth-client option (*“Use Anthropic’s hosted client metadata (Recommended)”*), it also connects successfully against Royal MCP today. Claude silently falls back to Dynamic Client Registration under the hood when your server doesn’t yet advertise CIMD support — so the end result is the same working connector.
[
Your browser doesn’t support embedded video.
](/royal-mcp/videos/claude-wizard-hosted-metadata.mp4)
Alternate path: manually selecting *“Use Anthropic’s hosted client metadata (Recommended)”* in the fallback screen. Claude falls back to DCR internally, completes OAuth, and the connector works end-to-end — verified inside a new chat.
### Coming back later — silent reconnect
Once you’ve completed the consent screen once, Claude stores the OAuth token. Every subsequent reconnect on the same Claude account skips the consent step entirely — you click the connector, it goes Connected, you’re back in business. This is what you’ll see day-to-day.
[
Your browser doesn’t support embedded video.
](/royal-mcp/videos/claude-reconnect-already-authorized.webm)
Reconnecting after the first-time setup — the OAuth token is already stored, so no consent screen appears.
When the silent reconnect stops being silent
If Claude shows the consent screen again on a reconnect, the stored token has expired or been invalidated. That’s normal — OAuth tokens have lifespans, and revoking a WordPress user account or changing OAuth client config in Royal MCP will invalidate existing tokens. Click Authorize once and you’re back to silent reconnects.
Or if you land on a WordPress-styled “Authorization Error” page instead
Same underlying cause as the silent-reconnect-that-isn’t: Claude’s stored `client_id` aged out or got invalidated. Sometimes, instead of a fresh consent screen, Claude redirects you to a plain WordPress-styled page on your own domain reading **“Unknown client\_id. The application has not been registered.”** Typical after 2+ idle days, several plugin updates in a short window, or switching between Royal MCP Free and Pro. Dedicated 60-second fix: [Unknown client\_id error →](https://royalplugins.com/support/royal-mcp/unknown-client-id-error/)
### Fallback: connect via API key (Claude Desktop ONLY, not claude.ai web)
The OAuth flow above works for the vast majority of customers. When it doesn’t — typically Cloudflare Bot Fight blocking `python-httpx`, cPanel ModSecurity returning 406, Imunify360 returning 429, a managed-host WAF, or the upstream [claude.ai web token-exchange bug](https://royalplugins.com/support/royal-mcp/claude-ai-web-token-exchange-fails/) — an API-key path via Claude Desktop is the working escape hatch.
🛑 The API-key path does NOT work in claude.ai web
Claude.ai’s browser “Add custom connector” dialog has exactly four fields: **Name**, **Remote MCP server URL**, **OAuth Client ID**, **OAuth Client Secret**. There is no custom-headers field, no API-key field, and no Advanced/Authentication panel. An existing connector has no edit screen either — only Remove. So an API key cannot be attached to a browser connection.
If OAuth is failing in claude.ai web and you need to keep working *right now*, switch to **Claude Desktop** (or **Claude Code CLI**) — both accept the API-key path described below. Same Royal MCP endpoint, same WordPress site, same tools; just different clients on your end.
Only use this if OAuth is failing
OAuth is the default for a reason — one-time consent, no key management, no copy/paste errors. Only switch to the API key path if you’ve already tried OAuth and it’s failing at the same step every time. Our [troubleshooting checklist](https://royalplugins.com/support/royal-mcp/troubleshooting-start-here/) will tell you whether your issue is one OAuth can recover from or one where the API key bypass is the right answer.
#### Copy your API key from WordPress
Go to **WP Admin → Royal MCP → Settings → General Settings**. The **WordPress API Key** field has the key pre-generated and visible — click **Copy**. If you want a fresh key (or the field is empty), click **Regenerate** first; that immediately invalidates the old one. Also confirm the **Enable Royal MCP Integration** toggle is on.
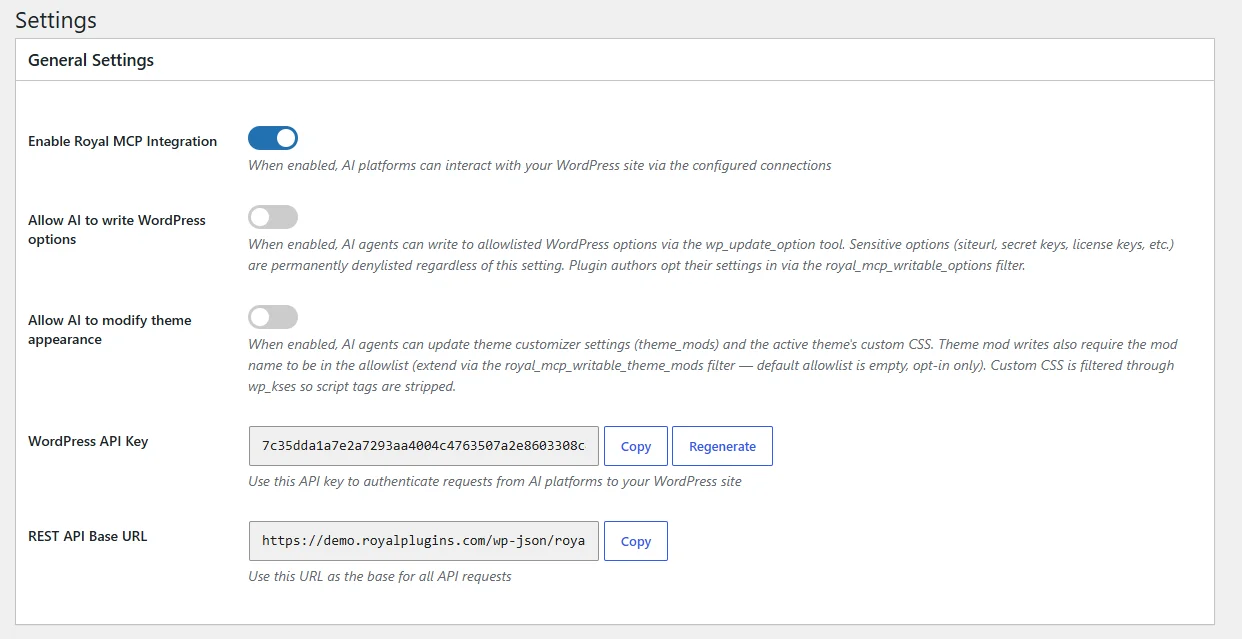
WP Admin → Royal MCP → Settings → General Settings. Copy the WordPress API Key value, or click Regenerate for a fresh one.
#### Add the connector in Claude Desktop with API key auth
In **Claude Desktop**, open Settings → Connectors → Add custom connector. Paste your MCP server URL (same as the OAuth path). Newer Desktop builds expose an Advanced / Authentication section where you can choose **API Key** or paste into a Custom Headers field as `Authorization: Bearer your-api-key`. If your Desktop build doesn’t show that field, use the `mcp-remote` wrapper path linked below.
#### Click Connect — no consent screen
Because you’re using an API key, there’s no OAuth dance, no consent prompt, no browser redirect. Claude tests the key against your MCP endpoint and marks the connector Connected.
#### Verify in a new chat
Same as the OAuth path — open a new conversation, enable the connector, ask Claude to do something WordPress-related.
Looking for the Claude Desktop + `mcp-remote` wrapper path?
If your version of Claude Desktop doesn’t expose the custom-headers field directly, you can use the `mcp-remote` npm wrapper to inject the `Authorization: Bearer` header from a config file. Full instructions: [Connect Claude Desktop via API Key (mcp-remote setup)](https://royalplugins.com/support/royal-mcp/connect-claude-desktop-api-key/).
## Claude Code (Terminal / CLI)
Claude Code is the official Anthropic CLI that runs in your terminal, VS Code, or JetBrains IDE. Connecting Royal MCP to it is a single command. No browser config, no Settings UI — everything happens at the command line.
Don’t have Claude Code installed?
Get it from [claude.com/claude-code](https://claude.com/claude-code). Available as a standalone CLI, a Mac/Windows desktop app, a web app at claude.ai/code, and as a VS Code or JetBrains extension. All of them share the same MCP connector config.
### With OAuth (recommended)
Add the Royal MCP server as a connector with one command. Claude Code will pop open your default browser for the one-time OAuth consent, then store the token in your local config for future sessions.
```
claude mcp add --transport http royal-mcp https://example.com/wp-json/royal-mcp/v1/mcp
```
Replace `example.com` with your actual WordPress site. Then start a Claude Code session, and on the first MCP call your browser will open with the OAuth consent screen. Click Authorize. The terminal session receives the token and the connector becomes active.
### Without OAuth — API key path
Same as the browser case — use this when OAuth is blocked by your host. Copy your API key from **WP Admin → Royal MCP → Settings → General Settings → WordPress API Key**, then pass it via the `--header` flag:
```
claude mcp add --transport http royal-mcp https://example.com/wp-json/royal-mcp/v1/mcp \
--header "Authorization: Bearer your-api-key-here"
```
No browser, no consent screen, no OAuth state. Claude Code attaches the header to every request.
### Verify your connection with /mcp
Inside any Claude Code session, type `/mcp` and press **Enter**. You’ll see the **Manage MCP servers** screen — every connector you have registered, grouped by scope (Project MCPs, User MCPs, claude.ai), with each one showing its connection state and tool count.
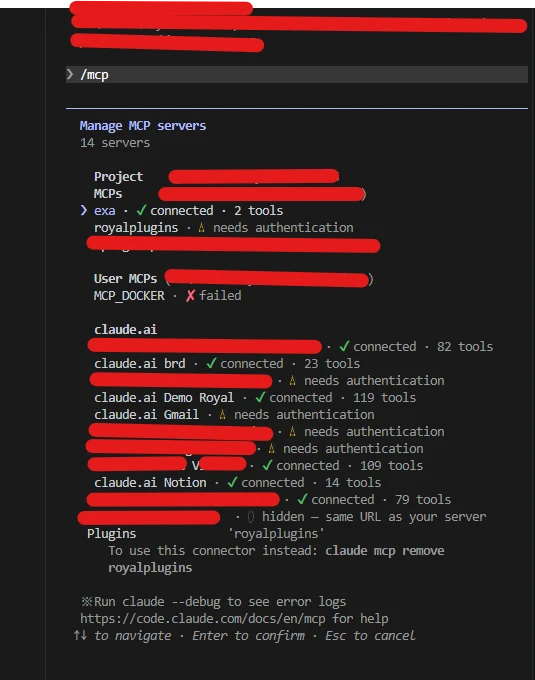
Claude Code /mcp output: every registered connector with status, grouped by scope.
Use the **up/down arrow keys** to navigate. Each connector shows one of these states:
- **✓ connected** — working; tool count is shown next to the status
- **▵ needs authentication** — OAuth token is stale, expired, or was never completed
- **× failed** — the server didn’t respond or returned an error; run `claude --debug` to see logs
Hover over any connector (green ✓ or red × or yellow ▵) and press **Enter** to get connector-specific options like Authenticate or Disable. Esc backs out at any level.
If you prefer a non-interactive view, you can also list servers from the shell:
```
claude mcp list
```
Use `/mcp` as your first diagnostic
If a tool isn’t working, type `/mcp` first. The screen tells you whether the server is connected, whether the tool list refreshed since you last used it, and whether the OAuth token has gone stale. About 80% of “reads work, writes don’t” reports from terminal users turn out to be a stale OAuth token that `/mcp` → Authenticate fixes — see the next section.
### Re-authenticate a stale connector
When a connector shows **▵ needs authentication** or **× not authenticated**, you don’t need to remove and re-add it. Just refresh the OAuth token in place:
1. Run `/mcp` in any Claude Code session.
2. Arrow down to the affected connector and press **Enter**.
3. You’ll see the connector detail screen with Status, Auth state, URL, Config location, and options:
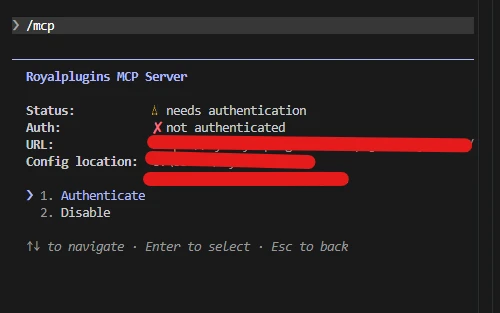
Per-connector options when a connector needs re-authentication. Arrow down to Authenticate and press Enter.
4. Select **Authenticate** and press Enter.
5. Claude Code opens your default browser for the OAuth consent screen — same flow as the initial setup. Click **Authorize**.
6. The terminal receives the fresh token and the connector flips back to **✓ connected**.
Why tokens go stale
OAuth access tokens have a lifespan. Royal MCP’s default is long-lived, but tokens can be invalidated early by: revoking a user account in WordPress, regenerating the OAuth client config, the user changing their WP password (depending on configuration), or simply the token aging out. The fix is always the same — re-authenticate in place via the steps above.
## After You Connect — First Things to Try
Royal MCP exposes the full WordPress data model to Claude: posts, pages, media, users, comments, taxonomies, WooCommerce products and orders (if WooCommerce is active), plus the Royal Plugins-specific tools (GuardPress security data, SiteVault backups, ForgeCache controls, etc.) for any premium plugins you have installed.
Try a few of these in your first conversation. Anchor each prompt with your site domain — if you have multiple sites connected, this tells Claude exactly which connector to use:
- *“On example.com, show me my five most recent posts and their categories.”*
- *“On example.com, create a draft post titled ‘Notes from today’ with this content: [paste].”*
- *“Which pages on example.com have the most internal links pointing at them?”*
- *“Search example.com’s media library for images of [topic] uploaded this year.”*
- *“What plugins are installed on example.com and which ones have updates available?”*
If a request fails, the first place to look is **WP Admin → Royal MCP → Activity Log**. Every Claude request lands there with the exact tool name, parameters, and result — that’s your single source of truth for what happened on the server.
## If Something Goes Wrong
If a connector won’t connect or a tool keeps failing, work through this short list before opening a support thread:
1. **Run the [Step 0 30-second edge probe](https://royalplugins.com/support/royal-mcp/troubleshooting-start-here/)**. Almost every “Claude won’t connect” issue traces back to your hosting edge (Cloudflare, managed-host WAF, ModSecurity, SiteGround nginx). Step 0 tells you in 30 seconds whether the problem is your host or your plugin.
2. **Check your Activity Log**. If you see `oauth:authorize` rows but no `oauth:token`, the token exchange is failing — usually a host blocking `python-httpx`. If you see nothing at all, the request isn’t reaching WordPress.
3. **Confirm plugin version**. The latest Royal MCP includes fixes for several common setup issues. Check **Plugins → Updates** for a newer version before troubleshooting further.
4. **Restart your Claude surface**. Stale OAuth tokens are the second-most-common cause of “suddenly stopped working.” Sign out of claude.ai / quit Claude Desktop / restart your terminal session, then reconnect.
For deeper diagnostics including curl probes you can run yourself, see the [curl deep-dive guide](https://royalplugins.com/support/royal-mcp/diagnose-mcp-with-curl/).
## Still Stuck? Two Support Paths
If you’ve worked through the checklist and your connection still fails:
### Community Support (free) — wp.org Plugin Forum
Post a new thread at [wordpress.org/support/plugin/royal-mcp/](https://wordpress.org/support/plugin/royal-mcp/). The Royal Plugins team monitors the forum regularly. Include the diagnostic info below.
### Premium Support (paid) — direct one-on-one help
For priority response (24-hour SLA) and hands-on diagnostic help, our [Premium Support tier](https://royalplugins.com/premium-support/) is $149/year. Direct email, full refund if we can’t resolve your issue.
#### Information to include in your post or ticket
- **Which surface** you’re trying to connect from (claude.ai web / Claude Desktop / Claude Code CLI).
- **OAuth or API key** path, and which step failed (consent screen never appeared, consent appeared but Claude reports failure, etc.).
- **Screenshot of the Activity Log** with the most recent `oauth:*` rows visible, View Details expanded on the failing row.
- **The exact error message** Claude shows, including any reference codes (`ofid_*`, `cf-ray`, etc.).
- **Your hosting provider** and whether Cloudflare is in front of the site.
[Troubleshooting checklist](https://royalplugins.com/support/royal-mcp/troubleshooting-start-here/)
[Back to Royal MCP Support](https://royalplugins.com/support/royal-mcp/)